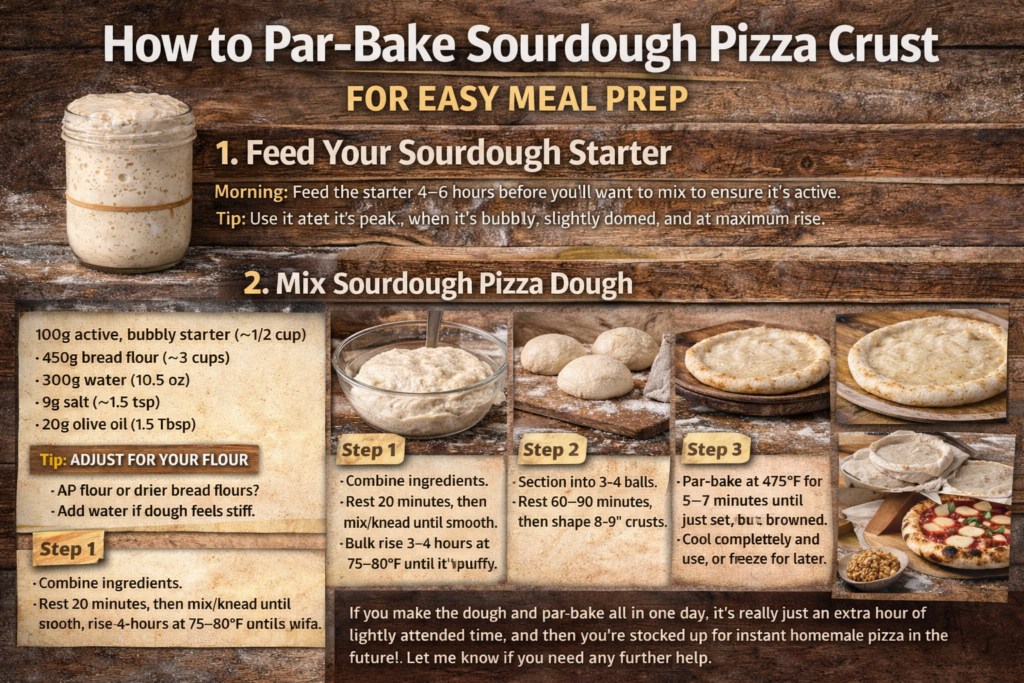
Imagine opening your freezer on a chaotic Tuesday night and pulling out a stack of artisan pizza bases, ready to top and bake in ten minutes. It sounds like a dream, doesn’t it? We all love the blistered, tangy flavor of fresh sourdough, but let’s be honest: the stretching, rising, and proofing process doesn’t always fit into a busy weeknight schedule.
The secret to having fast food convenience with slow-food quality is the “par-bake.” By partially baking your sourdough discard recipe ahead of time, you can essentially create your own high-quality frozen pizzas. No preservatives, no cardboard texture—just your own fermented dough, ready when you are.
par-baking is the secret to making this discard pizza recipe even more convenient for busy nights.”
In this guide, we will teach you the precise timing and temperature to “set” your dough without drying it out. You will learn how to turn your weekend baking session into a month’s worth of easy, gourmet dinners.
The Science: Gelatinization vs. Caramelization
To master par-baking, you have to understand exactly what is happening inside the oven. You are walking a fine line between “setting the structure” and “cooking the crust.”
The goal of par-baking is to achieve starch gelatinization without triggering the Maillard reaction. Gelatinization occurs between 140°F and 176°F. At this stage, the starch granules in the flour absorb water, swell, and explode, solidifying the dough’s structure. This turns the raw, wet batter into a stable, solid bread that can be handled and frozen.
However, you must stop baking before the crust hits 300°F. This is where the Maillard reaction (browning) begins. If you let the crust turn golden brown now, it will burn by the time you bake it a second time with cheese. You want the par-baked crust to remain pale, matte, and blonde.
Par-baking also solves the dreaded “gum line” issue—that layer of undercooked dough where the sauce meets the crust. By pre-baking the dough naked, you create a microscopic moisture seal or skin on the surface. When you eventually add sauce and finish baking, that skin prevents the liquid from seeping back into the crumb, ensuring a crispy bite every time.
Masterclass: The 3-Step Par-Bake Method
This process turns your raw dough into a “blank canvas” that can survive the freezer for months. Precision here is key to preventing a tough, cracker-like texture.
Step 1: Prep & Docking (The Critical Step)
Preheat your oven (and your stone or steel) to 500°F. While it heats, stretch your dough out on parchment paper just as you would for a fresh pizza.
Here is where the technique changes: you must dock the dough. Since there are no heavy toppings (sauce/cheese) to weigh the dough down, the steam generated during the bake will have nowhere to go. Without docking, your crust will experience massive oven spring in the center, puffing up like a pita bread or a balloon.
Take a fork and prick holes all over the center of the dough, leaving only the outer rim (the cornicione) untouched. These little vents allow steam to escape, keeping the center flat and the crust even.
Step 2: The Blind Bake
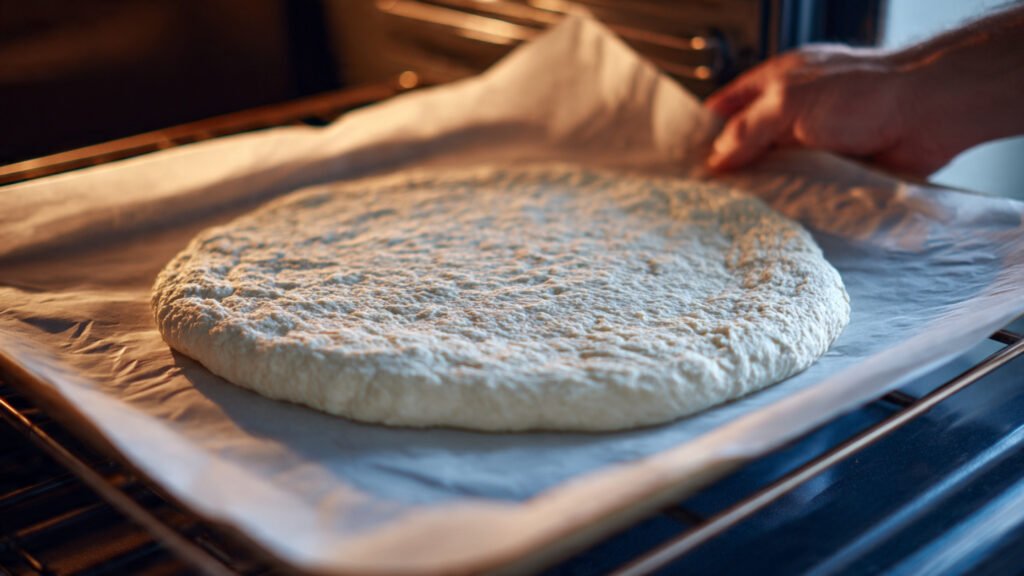
Slide your docked dough (on the parchment paper) onto your preheated stone or steel. Bake for exactly 3 to 4 minutes.
Do not walk away. You are not looking for color here. You want the surface to look matte and dry, rather than shiny and wet. The dough should feel stiff enough to hold its shape if you lift the edge, but it should still be completely pale. If you see it starting to brown, pull it out immediately. Remember, it will get baked again later; if you brown it now, you will burn it then.
Step 3: Cooling & Wrapping
Remove the crust and immediately transfer it to a wire cooling rack. Do not place it on a flat plate or cutting board. If you do, the residual heat will release steam that gets trapped underneath, creating condensation that makes your crust soggy and susceptible to mold.
Let the crusts cool completely—for at least one hour—until they are room temperature to the touch. Once cool, wrap each crust tightly in plastic wrap (cling film) to create an airtight seal. For extra protection against freezer burn, wrap that package again in aluminum foil or place it inside a large heavy-duty freezer bag.
Expert Pro-Tips for Reheating & Storage
To ensure your Tuesday night pizza tastes just as fresh as your Sunday bake, follow these rules.
- The “Oil Shield”: Before freezing, lightly brush the top of your par-baked crust with olive oil. This acts as a barrier, preventing the crust from drying out in the arid environment of your freezer. It also helps the crust crisp up immediately when it hits the oven later.
- Do Not Thaw: This is the most common mistake. When you are ready to eat, pull the crust from the freezer and top it while it is frozen. Place the frozen, topped pizza directly onto a hot stone. The sudden temperature difference (thermal shock) creates a fantastic, crispy bottom layer that thawing ruins.
- Sauce vs. Naked: You can freeze the crust with sauce on it (“Red Baron style”), but for the longest shelf life, freeze it naked. Wet sauce introduces ice crystals over time. Adding fresh sauce right before the final bake guarantees a better texture.
- Label Your Dates: Sourdough par-bakes are best used within 3 months. After that, the gluten structure begins to degrade due to ice crystal formation, leading to a tougher, drier chew.
Frequently Asked Questions
Why did my crust puff up into a ball? You likely skipped the docking step or didn’t poke enough holes. Without the weight of cheese and sauce, the steam inside the dough expands rapidly. If this happens, you can try to flatten it with a spatula while it’s hot, but prevention (using a fork) is the best cure.
Do I need to adjust the baking time for the final pizza? Yes. Since the dough is already cooked through, you are technically just melting the cheese and browning the crust. The final bake is much faster—usually 5 to 8 minutes at 500°F, compared to the standard 10–12 minutes for raw dough. Keep a close eye on it!
Can I par-bake in a cast iron skillet? Absolutely. If you don’t want to heat up the oven just to par-bake, you can cook the dough in a dry, hot cast iron skillet on the stovetop. Cook for 2 minutes on each side until set but pale. This is a brilliant energy-saving hack.
Does freezing kill the probiotics? Freezing puts the bacteria and yeast in a dormant state, but the high heat of baking (both the par-bake and the final bake) kills the live cultures. However, the benefits of fermentation—like broken-down gluten and lower glycemic index—remain intact even after baking and freezing.
Final Thoughts
Par-baking transforms sourdough pizza from a “weekend project” to a “Tuesday night solution.” By taking the time to set the structure of your dough in advance, you bank your effort for later. You get all the flavor, digestibility, and artisan texture of homemade sourdough, with the convenience of a frozen box.
So, next time you feed your starter, double the batch. Your future self—tired, hungry, and craving pizza—will thank you.