📐 Aliquot Method Deep Dives
This guide covers the complete aliquot method. For specific situations, see:
- Aliquot Method in a Cold Kitchen — Winter sourdough, slow fermentation, cold kitchen adjustments
- What Percentage Rise to Target — 25%, 50%, 75% rise explained + when to stop bulk
- Aliquot Method vs. Windowpane Test — Which actually tells you when bulk fermentation is done
New to the aliquot method? Start here with the complete guide, then jump to the specific situation that matches your bake.
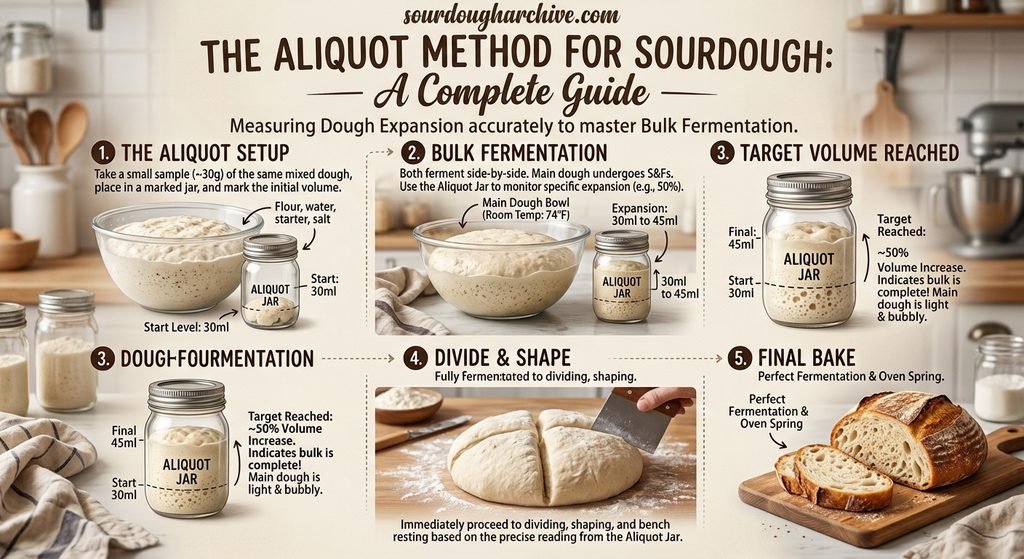
The aliquot method for sourdough is the single most reliable way to know when your bulk fermentation is finished. No more guessing. No more poking the dough and hoping. No more flat loaves from shaping too early or sticky messes from shaping too late. This step-by-step guide will have you using an aliquot jar on your next bake.
If you’ve been baking sourdough for any length of time, you’ve probably experienced this: you follow a recipe exactly, but your dough takes 3 hours when the recipe says 5 — or 7 hours when the recipe says 4. You shape anyway, bake anyway, and slice into a loaf that’s either dense and gummy or spread and flat. The recipe wasn’t wrong. Your kitchen temperature was different from the recipe developer’s, and bulk fermentation responded accordingly.
The aliquot method solves this completely. It removes time as the variable and replaces it with something you can actually see: the rise percentage of your dough, tracked in real time, in your kitchen, at your temperature.
What Is the Aliquot Method for Sourdough?
The word “aliquot” comes from Latin — it means “a portion of a whole.” In chemistry and laboratory science, an aliquot is a measured sample taken from a larger batch to represent the whole. When applied to artisan baking, the aliquot method for sourdough uses this exact principle to track bulk fermentation.
Here is the core idea: when you mix your dough, you set aside a small sample — typically 20–50 grams — in a narrow, clear glass aliquot jar. That sample ferments alongside your main dough at the same rate. Because the jar has straight sides and a small diameter, the rise is much easier to see and measure than in a wide mixing bowl. You mark the starting level, watch the sample rise, and shape your main dough when the sample hits your target percentage.
That’s it. The entire method is simply a small aliquot jar sitting next to your dough, doing the measuring for you.
The aliquot method doesn’t change how you bake. It changes how you know when to stop bulk fermentation — replacing guesswork with a number you can see.
Why Bulk Fermentation Is So Hard to Judge Without It
Bulk fermentation is the most variable stage in the entire sourdough process. The same recipe can finish in 3 hours in a warm kitchen or 8 hours in a cold one. A starter at peak activity will drive faster fermentation than one that peaked 2 hours ago. High-hydration dough ferments differently than a stiffer dough. Whole grain flour ferments faster than white.
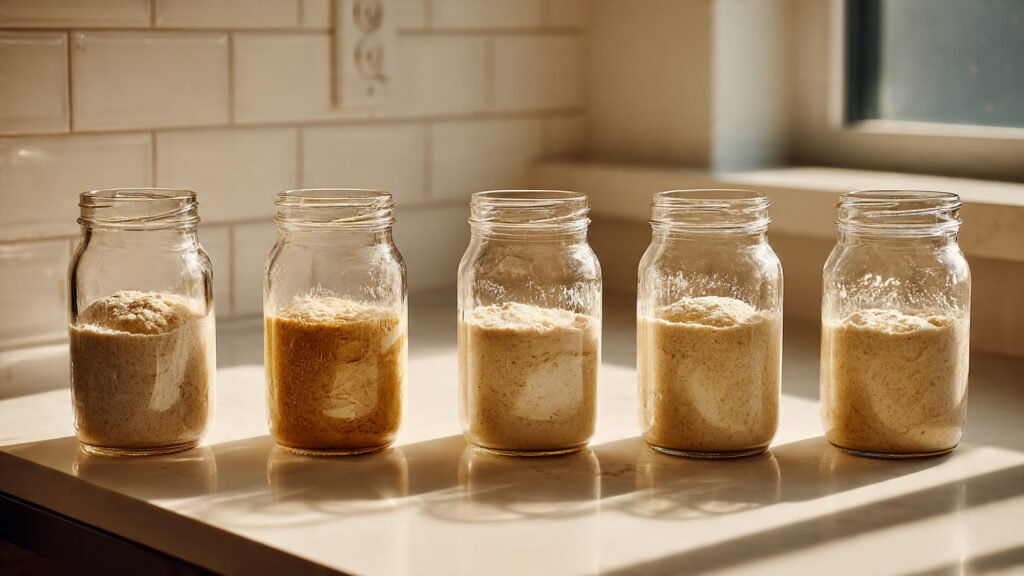
Most recipes compensate for this by giving a time range — “4–6 hours” — and telling you to look for visual cues: the dough should be “puffy,” “domed,” “jiggly,” or have “increased in volume by 50–75%.” These cues are real and useful, but they’re hard to read in a wide bowl where you can’t see the sides clearly, and they require experience to interpret correctly.
The two most common mistakes — under-fermenting and over-fermenting — produce very different failures:
- Under-fermented dough doesn’t open in the oven. It produces a dense, gummy crumb with no ear and poor oven spring. The interior looks tight and slightly raw even when fully baked.
- Over-fermented dough spreads during shaping, loses its structure, and produces a flat loaf with large irregular holes or a collapsed crumb. The surface often feels slack and sticky in a way that can’t be fixed with more shaping. This is especially common in warm environments — overly hot kitchens or heated proofing boxes can push your dough past its peak much faster than you expect.
The aliquot method gives you an objective measurement that sidesteps both failures. Instead of “I think it looks puffy enough,” checking your aliquot jar gives you “the sample is at 75% rise” — a number you can act on confidently.
What You Need
The aliquot method requires almost nothing you don’t already own:
- A narrow, straight-sided aliquot jar. This is the only essential piece. A standard clear glass jam jar works for most bakers. Straight sides matter — tapered jars make it harder to read the rise accurately. The jar should be tall enough that your dough sample can rise 100% without overflowing. A 2–4 oz jar is ideal for a 20–30g sample.
- A rubber band or food-safe marker. To mark your starting level. A rubber band around the outside of the jar at the starting dough height is the simplest method. A dry-erase marker on the outside of the glass also works well.
- A kitchen scale (recommended). To measure your sample consistently. Not strictly required — a rough walnut-sized piece works — but a scale makes the method more repeatable.
- A chopstick, butter knife, or wet finger. To press the dough into the bottom of the jar and eliminate air pockets under the sample.
Dedicated aliquot jars with pre-marked measurements are also available and make reading the rise even easier — but a standard jam jar is perfectly adequate for home baking.
Step-by-Step: How to Use the Aliquot Method
Step 1: Mix Your Dough Completely First
Mix your dough as normal — flour, water, starter, and salt. This last point is critical and often misunderstood: always take your sample for the aliquot jar after adding the salt.
Salt slows fermentation and strengthens gluten. If you take your sample before adding salt, it will ferment faster than your main dough and give you an inaccurate reading — you’ll think bulk fermentation is done when the main dough still needs more time. The sample must match the final dough composition exactly.
Step 2: Take Your Sample
After completing your initial mix (and after any autolyse period if your recipe includes one), take a 20–50g sample of dough from your main batch. The exact amount depends on your jar size — you want the sample to fill roughly the bottom third of the aliquot jar when pressed down flat. A walnut-sized piece is a useful rough guide if you’re not using a scale.
Use a wet chopstick, butter knife, or your finger to press the dough firmly into the bottom of the jar, pushing out any air pockets underneath. Air pockets underneath the sample will make it look like it’s risen more than it actually has. This step is critical for accuracy.
Step 3: Mark the Starting Level
Once the dough is pressed flat in the bottom of the jar, mark the top of the sample clearly. A rubber band stretched around the outside of the jar at the exact level of the dough top is the easiest method — it’s adjustable, visible from any angle, and doesn’t require anything other than a rubber band.
If you’re using a dedicated aliquot jar with markings, note the starting measurement. This is your zero point — the reference from which all rise percentages are calculated.
Advanced precision method: Some bakers use a companion water-filled jar to mark exact rise percentages. Fill an identical empty jar with water to your sample’s starting level, measure the weight, then add more water incrementally to mark 25%, 50%, 75%, and 100% rise points. This creates visual reference marks you can compare directly to your dough jar throughout fermentation.
Step 4: Keep the Sample With the Main Dough
Place the jar next to your covered main dough — not in a different location, not in a different room. The sample must experience the same ambient temperature as the main dough to give an accurate reading. If your main dough is in a proofing box, put the jar in there too. If it’s on the counter, the jar sits on the counter.
Cover the jar loosely — a lid set on top without tightening, or a small piece of plastic wrap. You want to prevent the surface from drying out without trapping gas that could distort the reading. Important: Do not seal the jar tightly. Sealed containers create pressure buildup that can artificially compress the dough or cause it to suddenly expand when opened, making readings unreliable.
Step 5: Perform Your Stretch and Folds as Normal
Continue your bulk fermentation routine — stretch and folds, coil folds, or lamination, whatever your recipe calls for. You do not need to touch or disturb the aliquot jar during this time. Just let it sit and rise alongside the main dough.
Some bakers take the sample after the first set of stretch and folds rather than immediately after mixing. Either approach works — just be consistent between bakes so your results are comparable.
Step 6: Read the Rise Percentage
Check your jar periodically — every 30–45 minutes once you’re past the halfway point of your expected fermentation time. Reading the rise is simple: look at where the top of the dough now sits relative to your starting mark.
To calculate the rise percentage:
Rise % = (Current height − Starting height) ÷ Starting height × 100
In practice, most bakers don’t calculate this precisely — they estimate visually. If the dough started at 1 inch high and is now at 1.75 inches, that’s approximately 75% rise. A rubber band at the starting point makes this visual estimation easy.
Step 7: Shape at Your Target Rise Percentage
This is the decision point. When your jar sample hits your target percentage, stop bulk fermentation and shape your main dough. The target depends on what result you’re going for:
| Target Rise % | Crumb Result | Flavor Profile | Best For |
|---|---|---|---|
| 25–50% | Tighter, more uniform crumb | Milder, less sour | Sandwich loaves, enriched doughs, beginners playing it safe |
| 50–75% | Medium open crumb, good structure | Balanced — mild tang | Everyday sourdough, most standard recipes |
| 75–100% | Open, holey crumb | More complex, tangier | Artisan loaves, high-hydration doughs, open crumb goals |
| 100%+ | Very open, requires excellent shaping skill | Pronounced sour | Advanced bakers, specific recipes |
For most home bakers using the aliquot method for sourdough, 50–75% rise is the best starting target. It produces a reliable, well-structured loaf with good oven spring and a satisfying crumb. Once you’ve nailed that, experiment with higher percentages to open up the crumb further.
Step 8: Return the Sample to the Main Dough
Don’t throw away the aliquot sample. When you tip your main dough out onto the counter to shape, add the sample back into the center of the dough and incorporate it during pre-shaping. It’s the same dough — there’s no waste.
Choosing the Right Aliquot Jar
Your choice of aliquot jar matters more than most beginners realize. Here’s what to look for when selecting one:
| Jar Type | Works? | Notes |
|---|---|---|
| Small jam jar (straight sides) | ✅ Yes — ideal | Most common choice, easy to find, works perfectly |
| 2 oz sample / specimen jar | ✅ Yes — ideal | Perfect size for 20–30g sample, easy to read |
| Dedicated aliquot jar (e.g. Billie Olive) | ✅ Yes — best | Pre-marked with measurements, tall and narrow for easy reading |
| Prescription bottle (clean) | ✅ Works | Narrow and straight-sided — surprisingly effective. Drill or poke a tiny hole in the lid to prevent pressure buildup. |
| Herb/spice jar (empty) | ✅ Works | Inexpensive and readily available; use rubber bands to mark rise percentages |
| Condiment container (small, lidded) | ✅ Works | Straight-sided takeout-style containers work well if clean and clear |
| Tapered jar (wider at top) | ⚠️ Not ideal | Harder to read rise accurately — use straight-sided instead |
| Wide-mouth jar | ⚠️ Not ideal | Rise is harder to see — narrow diameter gives clearer visual |
The key principle: narrow and straight-sided. A narrow jar amplifies the visible rise — the same volume increase shows up as a much larger height change in a narrow aliquot jar than in a wide bowl. This is what makes the reading easy and accurate.
Glass vs. Plastic Trade-Off: While glass is the standard choice, plastic specimen jars offer one advantage: lower heat capacity. Plastic jars warm up and cool down faster than glass, which means they match ambient temperature changes more closely and can actually provide more accurate readings in kitchens with temperature fluctuations. However, glass remains ideal for most bakers because it’s transparent, durable, and doesn’t absorb odors. Choose based on your kitchen’s temperature stability — if you bake in a climate-controlled space, glass is perfect; if your kitchen temperature swings 10–15°F during the day, a plastic jar may track fermentation more accurately.
How Temperature Affects Your Aliquot Reading
The aliquot method tracks fermentation visually regardless of temperature — which is precisely its advantage. But temperature still determines how fast the sample rises, which affects how closely you need to watch it.
- At 65–68°F: Fermentation is slow. The sample may take 8–12 hours to reach 75% rise. Check every hour — you have plenty of time between check-ins.
- At 72–76°F: Standard room temperature. Expect 5–7 hours to 75% rise. Check every 45–60 minutes in the latter half.
- At 78–82°F (proofer range): Active fermentation. Expect 3–5 hours to 75% rise. Check every 30 minutes once the sample is visibly rising.
- At 84–86°F: Fast fermentation. The sample can hit 75% in 2–3 hours. Check every 20–30 minutes and don’t step away.
Temperature-Based Target Rise: Fermentation speed isn’t the only thing temperature affects — your optimal rise percentage changes with dough temperature too. Warmer dough needs to be shaped at a lower rise percentage because fermentation continues during shaping and cold retard:
- At 80°F dough temp: Target 30% rise
- At 75°F dough temp: Target 50% rise
- At 70°F dough temp: Target 75% rise
If you’re using a Brod & Taylor Folding Proofer to hold your bulk fermentation at a consistent temperature, the aliquot method becomes even more powerful — you’ll quickly learn exactly how long your dough takes at your set temperature, making every future bake completely predictable. See our Brod & Taylor temperature settings cheat sheet for the ideal bulk fermentation temperature by dough type.
Common Mistakes and How to Avoid Them
Taking the sample before adding salt
As covered above — always take the sample after the complete dough is mixed, including salt. A pre-salt sample will ferment faster than your main dough and give a reading that’s ahead of the actual fermentation progress.
Not pressing the dough to the bottom of the jar
Air pockets under the dough in the jar create a false starting point. Use a wet chopstick or your finger to press the sample firmly to the bottom before marking the starting level. If you can see large bubbles under the dough through the side of the jar, push them out.
Keeping the jar in a different location from the main dough
Even a few degrees of temperature difference between the jar and the main dough will cause the sample to ferment at a different rate, making the reading inaccurate. Keep them together — same counter spot, same proofing box, same environment throughout bulk fermentation. If you’re performing bench lamination or bench folds on your main dough, both the jar and dough will cool slightly — that’s normal and they’ll re-warm together.
Water Temperature Matching: When mixing your dough, match your water temperature to your ambient room temperature. If your kitchen is 75°F, use 75°F water. This ensures the aliquot sample and main dough start at the same temperature and ferment at identical rates. A 10°F difference in water temperature will cause noticeable fermentation rate divergence — the main dough (heated by friction during mixing) will be warmer than the aliquot jar (cooled by the jar surface), leading to inaccurate readings. See our dough temperature guide for calculation details.
Using a jar that’s too small
If your sample fills more than half the jar at the start, it will hit the top before reaching your target rise percentage and you’ll lose the ability to track further. Aim for the dough to fill the bottom third of the jar at the starting point.
Sealing the jar lid tightly
Trapped gas creates pressure inside the jar, which can compress the dough or cause it to suddenly expand when opened. Always leave the lid loose or use a light covering like plastic wrap. This preserves surface hydration without trapping pressure.
Walking away and missing the target
The aliquot jar doesn’t alert you when it hits your target — you have to check it. Once fermentation is moving actively, check every 30–45 minutes. Missing your target by an hour at 80°F can be the difference between perfect and over-fermented.
Aliquot rising differently than the main dough
This is the most common beginner problem. When the aliquot jar’s sample rises faster or slower than the main dough, fermentation temperatures are mismatched. Here’s what’s happening and how to fix it:
- Sample rising faster than main dough: The jar is in a warmer location. Move it next to the main dough immediately. Alternatively, the jar has lower heat capacity (if plastic) and is warming faster than the main dough — keep both in the same thermally stable location.
- Sample rising slower than main dough: The jar is cooler than the main dough location. Glass jars cool faster than bulk dough masses; if your kitchen has warm and cool zones, the aliquot jar may be in the cooler spot. Move it to identical thermal conditions as the main dough.
- Sample barely rising despite main dough looking puffy: Check your starter strength. If your starter isn’t at peak activity, fermentation will be sluggish. Feed your starter 4–8 hours before mixing and use it at peak rise (when it’s roughly doubled and has a dome shape). A peaked starter produces reliable aliquot readings.
Aliquot Method vs. Alternative Bulk Fermentation Tracking Methods
| Method | Accuracy | Experience Required | Works in Any Kitchen? | Repeatable? |
|---|---|---|---|---|
| Aliquot jar | High — objective percentage | Low — beginners can use it immediately | Yes — tracks your actual dough | Yes — same target % every bake |
| Cambro container (straight-sided mixing bowl) | Medium-High — easy to see volume increase | Low — visual tracking | Yes — great alternative | Yes — mark the bowl |
| Visual dough cues (poke test, dome, jiggle) | Medium — requires interpretation | High — takes many bakes to read reliably | Partly — depends on bowl shape | Partly — varies by baker |
| Time-based (recipe says 4 hours) | Low — ignores your kitchen temp | Low — anyone can set a timer | No — recipe temp rarely matches yours | No — varies by season |
| Volume marker on bowl (rubber band on mixing bowl) | Medium — hard to read in wide bowls | Low | Yes | Partly — bowl shape limits accuracy |
The cambro container method is the closest alternative to the aliquot jar. A straight-sided container (cambro or similar clear mixing bowl with a 2-4 quart capacity) gives you the same principle — tracking visible rise — but on a larger scale. It works well if you mark the starting level with a rubber band, but the wider diameter means the rise is less dramatic and harder to read than a narrow aliquot jar.
When the Aliquot Method Doesn’t Work
Inclusion loaves (nuts, seeds, dried fruit, chocolate): The aliquot jar method is less reliable when your dough contains mix-ins. Inclusions change fermentation dynamics and may not distribute evenly between your sample and main dough. For inclusion loaves, use a cambro container instead or rely on visual cues combined with light finger-poke tests.
Cold retard (refrigerator fermentation): The aliquot jar is only useful during room-temperature bulk fermentation. Once the dough goes into the refrigerator, the sample no longer gives an accurate reading because the cold slows fermentation unevenly compared to room-temperature conditions. Shape at your target rise percentage during bulk fermentation, then move to the refrigerator for cold retard as your recipe directs. Reference our sourdough proofing time chart for cold retard timing guidance.
Frequently Asked Questions
What percentage rise should I use for the aliquot method?
For most home bakers, 50–75% rise is the best starting point. It produces a reliable, well-structured loaf with good oven spring. Once you’re consistently hitting good results at 75%, try pushing to 100% for a more open crumb and more complex flavor. For sandwich loaves or enriched doughs, 25–50% is usually the sweet spot. Temperature matters: use the guide above to adjust your target percentage based on dough temperature.
How much dough should I put in the aliquot jar?
20–50 grams, depending on your jar size. The sample should fill the bottom third of the jar when pressed flat. Too little and the rise is hard to read. Too much and the sample hits the top of the jar before reaching your target percentage.
When exactly should I take the aliquot sample?
After your dough is fully mixed including salt — either immediately after mixing or after your first set of stretch and folds. The key is that the sample must include salt and must match the final dough composition. Taking it before salt is added is the most common beginner mistake.
What if my aliquot jar and main dough are rising at different rates?
This almost always means they’re at different temperatures. Check that the jar is sitting directly next to the main dough, not in a cooler or warmer spot. If you’re proofing in an enclosed space, make sure the jar is inside it too. Temperature difference — even 3–4°F — is enough to cause a noticeable difference in rise rate. Bench lamination or handling of the main dough during the fermentation window will also cause the main dough to cool slightly while the smaller jar sample warms back up faster — this is normal.
Can I use the aliquot method for cold retard?
No. The aliquot jar is only useful during room-temperature bulk fermentation. Cold slows fermentation unevenly and makes the sample reading inaccurate. Shape at your target rise percentage, then move to the refrigerator for cold retard as your recipe directs.
Do I have to use a scale to measure the sample?
No — a scale makes the method more repeatable but isn’t essential. A rough walnut-sized piece of dough in a small jam jar gives you a perfectly functional aliquot sample. If you bake frequently and want to compare results between bakes, weighing the sample adds a useful layer of consistency.
What if I sealed my jar lid and trapped pressure inside?
Unseal it immediately. Trapped pressure compresses the dough and creates false readings. Leave the lid loose or covered with plastic wrap for the rest of fermentation. Your previous reading is unreliable — restart with a new sample if accuracy matters for your bake.
Want to go deeper? Check out our complete guide on bulk fermentation vs. proofing to understand the distinction between these critical stages, or explore the bulk fermentation chart at 75°F for detailed timing by dough hydration and temperature.
Related reading: How dough temperature affects fermentation · Sourdough proofing time chart · Brod & Taylor temperature settings cheat sheet · How to feed and maintain sourdough starter