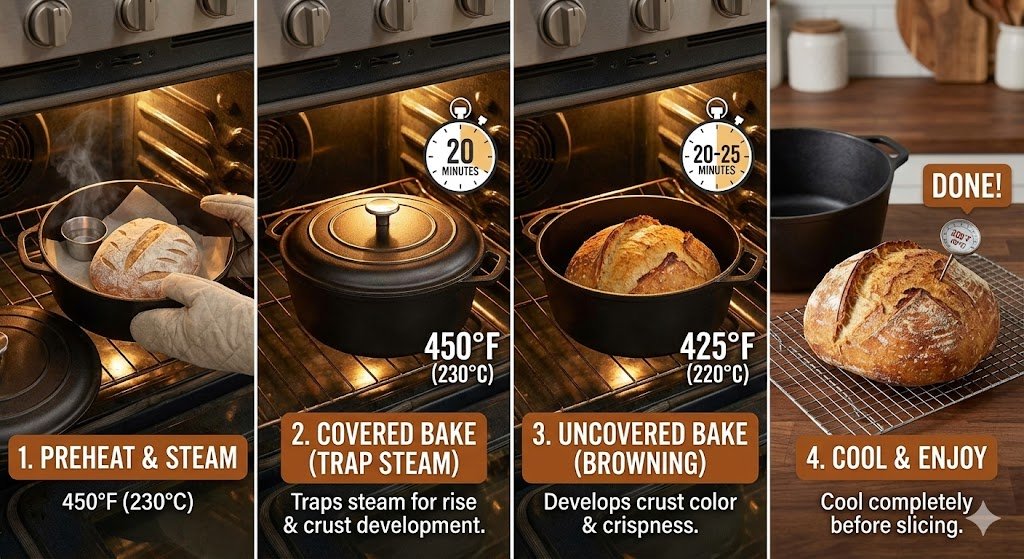
Preheat your Dutch oven inside your oven at 500°F / 260°C for at least 45–60 minutes, bake covered for 20 minutes to trap steam and allow maximum oven spring, then remove the lid and finish at 450°F / 232°C for 20–25 minutes until deeply golden. The covered phase is where your loaf blooms — do not open it early.
Quick Diagnostic Checklist
✅ Your Dutch oven bake is going well if:
- Loud crackling and hissing when the dough hits the pot — that’s steam doing its job
- Visible oven spring (loaf rising dramatically) within the first 10 minutes of baking
- Score opens wide and blooms beautifully during the covered phase
- Deep mahogany crust after lid-off phase — not pale, not black
- Loaf sounds hollow when tapped on the bottom after baking
- Internal temperature reads 205–210°F / 96–99°C at the centre
⚠️ Signs something went wrong:
- Loaf barely rose — pale, dense, flat (underproofed dough or Dutch oven not hot enough)
- Score didn’t open — blew out the side instead (dough shaped too tightly or score too shallow)
- Crust is pale and soft after full bake time (oven running cool; thermometer needed)
- Bottom is burnt but sides are pale (Dutch oven too close to heating element)
- Loaf stuck to the pot (insufficient parchment or flour)
🎯 Ideal outcome:
- Loaf has risen 30–50% taller than it went in
- Score opened dramatically with a defined “ear”
- Crust is deep amber to mahogany — crackles audibly as it cools
- Crumb is open, moist, and fully cooked through to the centre
1. Why a Dutch Oven Makes Home Sourdough Possible
Professional bakeries use deck ovens that inject steam for the first phase of baking. Steam keeps the crust soft and extensible during oven spring — allowing the loaf to expand dramatically before the crust sets. Without steam, the crust hardens within minutes, the score can’t open properly, and you end up with a pale, dense loaf that bursts randomly at the weakest point.
A Dutch oven — a heavy, lidded cast iron or enamelled pot — solves this problem brilliantly for home bakers. When you place cold or room-temperature dough into a screaming-hot Dutch oven and seal the lid, the moisture naturally present in the dough evaporates rapidly and is trapped inside the pot, creating a perfect steam environment around the loaf for the first 20 minutes of baking. This is the single biggest reason home sourdough has become so accessible in the last decade.
Understanding what the Dutch oven is doing at each stage — and why temperature and timing matter so precisely — will help you troubleshoot any bake and get consistent results every time.
If your dough isn’t ready for the oven yet, check our Cold Fermentation Guide to make sure your loaf is properly proofed before baking. And for scoring guidance before the dough goes in, see our Sourdough Scoring Guide.
2. The Science: What’s Happening Inside the Dutch Oven
Baking sourdough is a race between two processes: oven spring (the final explosive rise driven by heat) and crust formation (the hardening of the outer surface that eventually stops the rise). The Dutch oven manages this race by controlling the environment around the loaf with precision.
Phase 1 — Covered (steam phase, 0–20 minutes): The intense heat from the preheated cast iron transfers immediately to the base and sides of the dough. Yeast produce one final burst of CO₂ in the heat before dying off — this is oven spring. Simultaneously, the moisture evaporating from the dough surface creates a steam-rich microclimate inside the pot. This steam condenses on the cool dough surface, keeping it soft and extensible so the score can open and the loaf can expand fully.
Phase 2 — Uncovered (crust phase, 20–45 minutes): The lid comes off, steam escapes, and the exposed crust begins to dry rapidly. The Maillard reaction — a chemical reaction between amino acids and reducing sugars at temperatures above 285°F / 140°C — produces the deep brown colour and complex flavour compounds that make a great crust. Caramelisation of sugars in the outer crust layer adds additional colour and sweetness. Internal temperature continues rising until the crumb is fully set.
Key scientific concepts at work:
- Oven spring — heat-driven CO₂ expansion plus steam alcohol evaporation causes rapid loaf volume increase in the first 10 minutes
- Steam gelatinisation — surface steam keeps starches soft and extensible, allowing the score to bloom rather than tear
- Maillard reaction — responsible for brown crust colour and flavour complexity; requires temperatures above 285°F / 140°C and low surface moisture
- Thermal mass — preheated cast iron holds and radiates intense, even heat far more effectively than a standard baking sheet
- Internal starch gelatinisation — the crumb “sets” structurally as internal temperatures pass 180°F / 82°C, which is why underbaking produces gummy interiors
- Crust crackle — the audible crackling as the loaf cools is rapid contraction of the rigid outer crust as steam escapes — a sign of a well-baked loaf
3. Dutch Oven Size, Material & Setup
What Size Dutch Oven Do You Need?
For a standard 900g–1000g / ~2lb sourdough loaf (made from 500g flour), a 5–6 quart / 4.7–5.7 litre Dutch oven is ideal. Too small and the loaf hits the sides before it can fully expand. Too large and the steam disperses too widely to be effective.
| Dough Weight (flour) | Recommended Dutch Oven Size |
|---|---|
| 300–400g flour (small loaf) | 3.5–4 quart / 3.3–3.8 litre |
| 450–550g flour (standard loaf) | 5–6 quart / 4.7–5.7 litre |
| 600–750g flour (large loaf) | 7–8 quart / 6.6–7.6 litre |
Cast Iron vs Enamelled Cast Iron vs Combo Cooker
Bare cast iron (like a Lodge Dutch oven): Excellent heat retention, extremely durable, inexpensive. Requires seasoning. Do not use above 500°F / 260°C with some seasoning oils. A reliable workhorse.
Enamelled cast iron (like Le Creuset or Staub): Beautiful, easy to clean, no seasoning required, and the enamel coating doesn’t react with the acidic dough. Can typically be used up to 500°F / 260°C — check manufacturer limits. The gold standard for most home sourdough bakers.
Combo cooker (like Lodge Cast Iron Combo Cooker): A shallow skillet and deep pot that nest together. The shallow side becomes the lid, making it easier to load the dough without burning your arms on tall pot sides. A popular alternative, especially for beginners.
Knob Warning
If your Dutch oven has a phenolic (plastic) knob on the lid, check its heat rating before preheating at 500°F / 260°C. Many are only rated to 400°F / 204°C. Swap it out for a stainless steel knob before baking at high temperatures — this is a 5-minute fix and a $10 part.
4. How to Bake Sourdough in a Dutch Oven — Step by Step
What You Need
- Dutch oven (5–6 quart recommended)
- Parchment paper
- Lame or sharp serrated knife for scoring
- Oven thermometer (your oven’s dial is often 25–50°F off)
- Heat-resistant oven mitts (Dutch ovens get extremely hot)
- Wire cooling rack
Step-by-Step Baking Method
- Preheat your oven and Dutch oven together. Place the Dutch oven (with lid on) on the centre rack of your oven. Set to 500°F / 260°C. Allow to preheat for a minimum of 45 minutes — 60 minutes is better. The Dutch oven must be thoroughly saturated with heat, not just brought to temperature. This step is non-negotiable.
- Prepare your dough for baking. Remove your proofed dough from the fridge (if cold-proofed). Cut a piece of parchment paper large enough to line the Dutch oven with a few inches of overhang on the sides — these become handles for lowering the dough in safely. Place the parchment over your banneton and flip: the dough is now sitting on the parchment, seam-side down.
- Score immediately. Work quickly — cold dough warms fast. Make your score(s) with confidence: a single slash at 30–45° to the surface, ½ inch / 1.3cm deep. See our full scoring guide for pattern options. Scoring must happen right before the dough goes into the oven.
- Load the dough. Using oven mitts, carefully remove the Dutch oven from the oven and remove the lid. Lower the parchment sling with the scored dough gently into the pot. The dough should sit centred in the pot with parchment sides folded inward if needed.
- Replace the lid and bake covered at 500°F / 260°C for 20 minutes. Do not open the oven or lift the lid during this phase. The steam is building inside and the loaf is undergoing oven spring. Opening the lid releases steam and collapses the process.
- Remove the lid and reduce temperature. After 20 minutes, carefully remove the lid using oven mitts (steam will escape — stand back). Reduce oven temperature to 450°F / 232°C. Continue baking uncovered for 20–25 minutes, or until the crust reaches a deep amber to mahogany colour.
- Check internal temperature. Insert an instant-read thermometer into the centre of the loaf — target 205–210°F / 96–99°C. If you don’t have a thermometer, tap the bottom — a hollow knock means it’s done. A dull thud means it needs more time.
- Cool completely before cutting. This is critical. Transfer to a wire rack and allow to cool for a minimum of 1 hour — ideally 2 hours. Cutting too early releases steam from the crumb before it has set, resulting in a gummy, doughy interior even if the loaf was perfectly baked.
5. Baking Time & Temperature Reference Table
| Phase | Temperature | Duration | Lid | What’s Happening |
|---|---|---|---|---|
| Preheat | 500°F / 260°C | 45–60 min | On | Dutch oven saturates with heat |
| Steam phase | 500°F / 260°C | 20 min | On | Oven spring + score bloom |
| Crust phase | 450°F / 232°C | 20–25 min | Off | Maillard browning + crust set |
| Cool | Room temp | 60–120 min | N/A | Crumb sets + steam escapes |
| Total active bake time | — | 40–45 min | — | — |
Note on darker crust preferences: If you love a very dark, crackling crust (the kind that shatters when you squeeze it), extend the lid-off phase by 5–8 minutes, watching closely. Every oven is different — an oven thermometer is the single best investment a sourdough baker can make.
6. Dutch Oven Baking Troubleshooting
Problem: Loaf is flat with no oven spring
Why it happens: Most commonly, the dough was overproofed before baking and had no energy left for oven spring. Can also be caused by a Dutch oven that wasn’t hot enough. Fix: Verify your Dutch oven preheated for a full 45–60 minutes. Check your proofing — an overproofed loaf will feel very soft, almost liquid, and will have little resistance when poked. Use your aliquot jar religiously to avoid overproofing. See our Underproofed vs Overproofed Guide for crumb diagnosis.
Problem: Score didn’t open — loaf burst on the side
Why it happens: The score was too shallow, cut at the wrong angle, or the dough had too much surface tension. Gas found the path of least resistance — a weak spot on the side — instead of your intentional score. Fix: Score at a 30–45° angle to the surface (not straight down), at least ½ inch / 1.3cm deep. A razor-sharp lame makes a huge difference. Dust the surface lightly with flour or rice flour before scoring to reduce drag.
Problem: Crust is pale and soft after full bake time
Why it happens: Your oven is running cooler than the dial indicates — extremely common. Most home ovens are 25–75°F / 14–42°C below their stated temperature. Fix: Buy an oven thermometer — they cost under $15 and are invaluable. If your oven runs cool, increase your set temperature by 25°F / 14°C, or extend the lid-off phase. You can also turn on the convection fan for the last 10 minutes for extra browning.
Problem: Bottom of the loaf is burnt
Why it happens: The Dutch oven is sitting too close to the lower heating element, or you’re using a dark-coloured pot that absorbs more radiant heat from below. Fix: Move your rack up one position. Place a second baking sheet on the rack below the Dutch oven to act as a heat buffer. If using bare cast iron, its dark surface intensifies bottom heat more than enamelled pots.
Problem: Loaf stuck to the Dutch oven
Why it happens: Insufficient parchment, or the parchment shifted during loading. Fix: Always use parchment paper — don’t skip it even with a well-seasoned pot. Cut parchment large enough to have 3–4 inch / 7–10cm handles on both sides. For extra insurance, dust the parchment with semolina or rice flour before placing the dough on it.
Problem: Crumb is gummy inside even though the crust looks done
Why it happens: Either the loaf was underbaked (internal temp didn’t reach 205°F / 96°C) or it was cut too soon before the crumb had time to set. Fix: Use a thermometer to verify doneness. Never cut sourdough before it has cooled for at least 1 hour — 2 hours is better. The crumb sets as the loaf cools; cutting early releases trapped steam and creates a gummy, doughy texture even in a perfectly baked loaf.
Problem: Dough deflated when I scored it
Why it happens: The dough was overproofed — the gas structure was too fragile to withstand even a light touch. Fix: Bake it anyway — you’ll still get bread, just not optimal oven spring. Going forward, end bulk and proof earlier. Use your aliquot jar and the poke test together to catch the proofing sweet spot before it tips over.
7. “Something Went Wrong Mid-Bake — What Do I Do?”
Lid came off accidentally during steam phase: Replace it immediately and add 5 extra minutes to the covered phase. You’ll lose some steam, so oven spring may be slightly reduced, but the loaf can still recover well.
Forgot to score and the loaf is already in the oven: If you catch it within the first 3–4 minutes, remove it quickly, score, and return it. After that, let it bake — an unscored loaf will burst somewhere random, but it will still be delicious. Call it “rustic.”
Oven temperature spiked or dropped mid-bake: If it spiked and the crust is colouring too fast, remove the lid phase early and reduce the temperature. If it dropped, extend bake time and verify with an internal thermometer before pulling the loaf.
Loaf looks done outside but thermometer reads under 200°F / 93°C: Cover loosely with aluminium foil to prevent the crust burning and continue baking until the centre reads 205–210°F / 96–99°C. This usually adds 5–10 minutes.
8. Frequently Asked Questions
Do I have to preheat the Dutch oven?
Yes — this is the most important step and the one most beginners skip or rush. A cold Dutch oven cannot generate the bottom heat and steam environment needed for oven spring. 45 minutes minimum, 60 minutes if your oven runs cool. Set a timer when you turn the oven on so you don’t forget.
Can I bake sourdough from room temperature instead of cold?
Yes. Room-temperature dough bakes beautifully and often gives slightly more oven spring than cold dough because the yeast are more active. The tradeoff is that room-temp dough is softer and harder to score cleanly. Cold dough (straight from the fridge) holds its shape better for scoring. Most bakers cold-proof overnight and bake cold — but either works.
What if my Dutch oven lid doesn’t seal tightly?
A small gap won’t ruin your bake — the steam environment will be slightly less intense but still effective. If the gap is large, drape a piece of aluminium foil over the pot before placing the lid to help seal it. Some bakers also add 2–3 ice cubes to the Dutch oven alongside the dough right before sealing to generate extra steam.
Can I use a cast iron skillet instead of a Dutch oven?
A skillet alone won’t trap steam. However, you can use a skillet as the base with a stainless steel bowl, another cast iron skillet, or a roasting pan as the lid — anything that traps steam around the loaf for the first 20 minutes. This is covered in detail in our Baking Without a Dutch Oven Guide.
Why does my loaf look great in the Dutch oven but deflate when I take it out?
If the loaf sinks when removed from the pot, it’s underbaked — the internal structure hasn’t fully set. The crumb needs to reach 205°F / 96°C to gelatinise fully. Return it to the oven directly on the rack (no pot) for 5–10 more minutes.
How do I know when to pull the loaf out?
Colour is your first cue — deep amber to mahogany, not golden. Sound is your second — tap the bottom and listen for a hollow knock. Temperature is your most reliable guide — 205–210°F / 96–99°C at the centre confirms it’s done regardless of colour. Use all three together for consistent results.
Want printable baking temperature charts, oven spring troubleshooting guides, and beginner-proof baking timelines?
They’re all inside the Sourdough Mastery System:
👉 sourdougharchive.com/the-bundle
Related Sourdough Guides
- 📖 How to Score Sourdough — score confidently before the dough goes in
- 📖 Cold Fermentation Guide — how overnight proofing affects your bake
- 📖 Underproofed vs Overproofed Sourdough — diagnosing bake results from the crumb
- 📖 How to Bake Without a Dutch Oven — home steam alternatives if you don’t have one
- 📖 Aliquot Jar Guide — making sure your dough is ready before it hits the oven
- 📖 Sourdough Mastery: The Complete Beginner’s Guide — the full roadmap