The bread poke test is a simple, reliable way to check if your sourdough is ready for the oven. Press your floured finger into the dough about half an inch. If the indent slowly springs back halfway, your dough is perfectly proofed. If it springs back quickly, it needs more time. If it doesn’t spring back at all, the dough is overproofed.
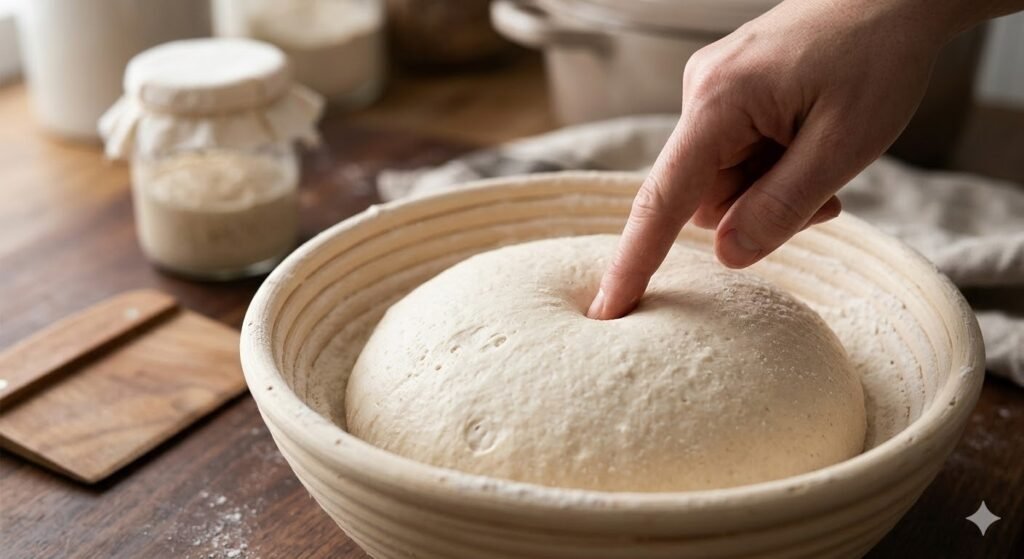
This hands-on test takes just seconds but saves your entire bake. It’s far more accurate than guessing, and it works regardless of room temperature or dough hydration. You don’t need fancy equipment — just your finger, a little flour, and confidence.
Why the Poke Test Matters for Your Sourdough
The bread poke test is your most reliable tool for avoiding two of the most common sourdough mistakes: underproofing and overproofing. Both destroy your crumb structure, oven spring, and crust. Knowing exactly when your dough has fermented to the sweet spot is the difference between a stunning loaf and a dense, gummy mess.
The poke test works because the differences between overproofed and underproofed dough are physical — not just theoretical. Overproofed dough has expanded beyond its gluten network’s capacity. Underproofed dough hasn’t developed enough gas. The poke test reveals exactly which stage your dough is in. For a full visual comparison of what each stage looks like, see our guide on underproofed vs overproofed sourdough.
How to Perform the Bread Poke Test (Step-by-Step)
Step 1: Prepare Your Dough
During the final proof — whether on the counter or in the cold fridge overnight — your dough should look puffy and slightly domed. It’s not at its maximum size yet; it has room to grow in the oven. Overproofed dough often looks jiggly or may have small tears in the surface.
Step 2: Flour Your Finger
Before touching the dough, dust your pointer finger with a bit of flour. This prevents sticking and helps you feel the dough’s resistance without leaving a wet fingerprint behind.
Step 3: Press Gently
Press your floured finger into the dough about half an inch deep. A gentle, confident press is all you need. The goal is to create an indent and observe how it responds.
Step 4: Remove Your Finger and Observe
Pull your finger out and watch what happens to the indent over the next 2–3 seconds. The speed and extent of recovery tells you everything about where your dough is in the proofing timeline.
Reading the Bread Poke Test Results
| Poke Test Result | What It Means | What to Do |
|---|---|---|
| Springs back instantly (under 1 second) | Underproofed | Wait 30–60 more minutes, test again |
| Springs back slowly (2–3 seconds), halfway | Perfectly proofed | Bake immediately |
| Doesn’t spring back at all | Overproofed | Use a rescue method — see below |
The Indent Springs Back Quickly (Within 1 Second)
What it means: Your dough is underproofed and not ready for the oven yet. The dough still has tight gluten and hasn’t developed enough gas pockets. Baking now will result in a dense, tight crumb and poor oven spring — the loaf will burst wildly along the sides rather than rising through the score. Give your dough another 30–60 minutes and test again. For more on diagnosing underproofed dough, see our guide on underproofed vs overproofed sourdough.
The Indent Springs Back Halfway (Over 2–3 Seconds)
What it means: Your dough is perfectly proofed and ready to bake. This is the sweet spot: enough gas development, but the gluten structure is still intact. Your bread will have great oven spring and a beautiful open crumb. Bake immediately, or cold proof in the fridge if you need more time flexibility — cold fermentation will pause fermentation and buy you hours.
The Indent Doesn’t Spring Back At All
What it means: Your dough is overproofed. The gluten has relaxed completely, and there is nowhere for the dough to grow during baking. The bread will spread flat instead of rising, with a dense, gummy interior. Don’t throw it out — see our guide on how to fix overproofed sourdough for four rescue options including focaccia, flatbread, and cold reshaping.
How Dough Temperature Affects the Poke Test
Here is a detail that makes a huge difference: warm dough springs back faster than cool dough. Temperature affects both fermentation speed and gluten elasticity.
If your kitchen is warm (75°F+), your dough will spring back more quickly at each proofing stage. A dough at 78°F might need only 4 hours of bulk fermentation, while the same recipe at 68°F might need 6–7 hours. This is why the poke test is so valuable — it reads your actual dough, not just the clock. Our bulk fermentation chart maps exact times to temperatures so you know what to expect before you even poke.
During cold fermentation (overnight in the fridge), the bread poke test behaves differently. Cold dough is stiff and will spring back more slowly, even if perfectly proofed. Do not use the poke test on cold dough straight from the fridge — the cold temperature contracts the gluten and makes even perfectly proofed dough feel underproofed. Use the visual check instead: look for a slightly puffy, domed surface with bubbles visible around the edges. For the full guide on reading cold-proofed dough, see our cold proofing guide.
Understanding how temperature drives fermentation is the foundation of consistent sourdough. Our guide on how dough temperature affects fermentation covers this in full detail.
Pro Tips for Bread Poke Test Mastery
- Test multiple spots: Poke near the edge and near the center. Dough can proof unevenly, especially in different shaped baskets.
- Use a banneton: Bannetons are designed to proof evenly. If you are using a bowl, shape and position matter more.
- Factor in shape: Batards and boules proof differently. See our guide on how to shape a sourdough boule and batard — tight shaping makes the poke test more predictable.
- Cold proof adds flexibility: If your dough springs back perfectly at 2 PM but you can’t bake until 6 PM, place it in the fridge. Cold fermentation slows the clock significantly.
- Use the aliquot jar alongside the poke test: The aliquot jar method tracks your bulk fermentation rise percentage — combine it with the poke test for the most reliable readiness check.
- Trust your instinct: After a few bakes, your hands will start to recognize the feel of perfectly proofed dough. The poke test becomes second nature.
Frequently Asked Questions
What is the bread poke test?
The bread poke test is a simple method for checking if sourdough dough is properly proofed and ready to bake. Press a floured finger half an inch into the dough and watch how the indent recovers. Slow spring back (2–3 seconds, halfway) means perfect proof. Instant spring back means underproofed. No spring back means overproofed.
Can you use the poke test on cold dough?
No — the poke test is not reliable on cold dough straight from the fridge. Cold temperature physically stiffens the gluten network, making even perfectly proofed dough spring back slowly and feel underproofed. On cold-proofed dough, use a visual check instead: look for a slightly puffy, domed surface with bubbles around the edges. Score and bake directly from the fridge without the poke test.
What if my dough doesn’t pass the poke test?
If the dough springs back instantly (underproofed), give it 30–60 more minutes at room temperature and test again. If the indent stays permanently (overproofed), do not bake it as a standard loaf — pivot to focaccia, flatbread, or cold reshaping instead. Both are salvageable with the right approach.
Is the poke test the same as the float test?
No — they test different things. The float test checks whether your sourdough starter is active enough to leaven bread (drop a spoonful in water — if it floats, it’s ready). The poke test checks whether your shaped dough has proofed sufficiently before baking. Use the float test before mixing your dough, and the poke test before putting it in the oven.
How do I know if my sourdough is overproofed without the poke test?
Overproofed dough has several visual signs: it looks very flat or has started to collapse, the surface may have large irregular bubbles or small tears, and it feels extremely slack and sticky when handled. When you score it, the dough may deflate rather than hold its shape. See our complete guide on how to fix overproofed sourdough for rescue options.
Final Thoughts
The bread poke test is the simplest, most reliable way to nail perfect proofing every single bake. It works at any temperature, with any hydration level, and requires zero equipment beyond your finger and a pinch of flour. Start using it today and you will immediately see improvements in your crumb structure, oven spring, and overall bread quality.
Master this one technique and you will never wonder “Is it ready?” again.
Want to go deeper on proofing and fermentation? These guides cover everything:
- Bulk Fermentation for Beginners — the first fermentation phase and when to wrap it up
- How to Know When Bulk Fermentation Is Done — visual and tactile signs beyond the poke test
- Sourdough Bulk Fermentation Chart — temperature and time reference guide
- How Long Can You Cold Proof Sourdough — extend your proofing window and flavor development
- Sourdough Proofing Time Chart — reference guide for your kitchen conditions
- Underproofed vs Overproofed Sourdough — full diagnosis and fix guide