Dense sourdough is frustrating. You followed the recipe. You waited patiently. You baked it carefully — and instead of an airy, open crumb, you got a heavy, tight loaf.
If you’re wondering why your sourdough bread is dense, the answer almost always falls into one of five categories:
- Underproofing
- Overproofing
- Weak starter
- Poor gluten development
- Baking temperature problems
Let’s break each one down clearly so you can diagnose your loaf with confidence.
Sourdough bread turns out dense when fermentation was incomplete, the starter lacked strength, gluten structure was weak, or the loaf was baked improperly. Dense crumb is almost always a fermentation or structure issue — not the flour.
Step 01 — Underproofing vs Overproofing (The #1 Cause)
Most dense sourdough is underproofed. But overproofing can also cause heaviness — in a different way. Understanding the difference changes everything.
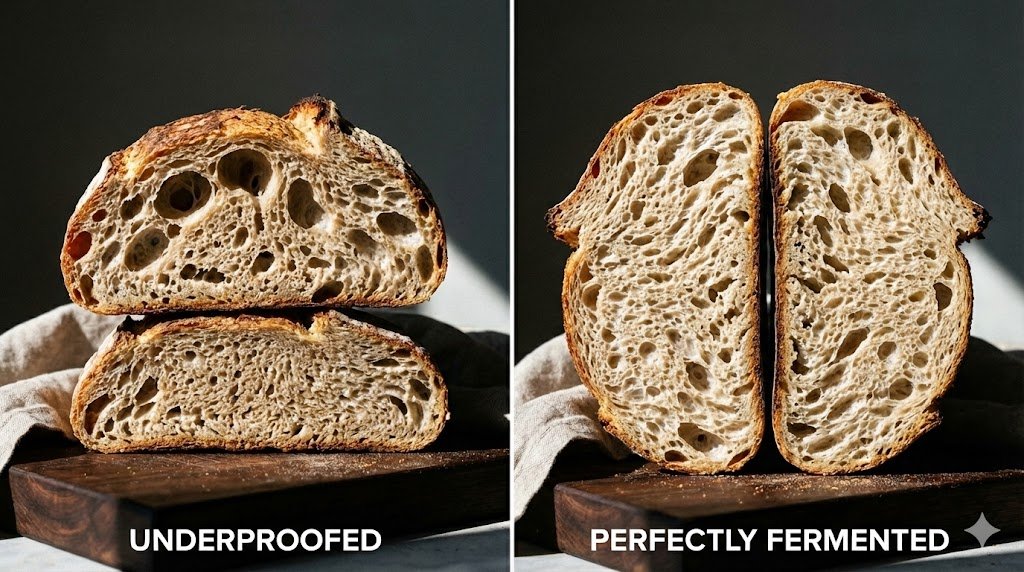
Underproofed Sourdough — Most Common
This is the culprit in the vast majority of dense loaves. When fermentation doesn’t progress far enough during bulk rise or final proof, the yeast doesn’t produce enough gas and the gluten doesn’t fully relax and expand. The result is a crumb that looks like the left side of the image above: tight, uneven, with a gummy interior.
- Tight crumb with small uniform holes
- Gummy or wet interior
- Large air pocket near the top crust
- Heavy feel when lifting
- Pale, under-blistered crust
- Open, irregular crumb structure
- Light, custardy interior
- Even gas distribution throughout
- Noticeably lighter than it looks
- Deep, blistered mahogany crust
Overproofed Sourdough
Overproofing causes a different kind of density. When fermentation goes too long, the gluten network breaks down and can no longer hold gas. The loaf spreads sideways instead of rising up, producing a flat, fragile loaf with minimal oven spring.
| Sign | Underproofed | Overproofed |
|---|---|---|
| Crumb | Tight, dense, uniform | Collapsed, irregular, gummy |
| Oven Spring | Explosive split, no ear | Minimal rise, no spring |
| Dough Feel | Tight, elastic, springy | Slack, fragile, tears easily |
| Final Shape | Tall but dense interior | Flat and spreading |
| Fix | Extend bulk time | Shorten proof, lower temp |
Not sure which camp you’re in? Our detailed guide on overproofed vs underproofed sourdough covers the visual differences side by side with specific diagnostic tests.
Step 02 — Starter Strength Diagnostics
A weak starter creates dense bread — even if fermentation time seems correct. Your starter must be active, recently fed, doubling within 4–6 hours, and full of visible bubbles before you bake.
“A sluggish starter doesn’t just slow things down — it fundamentally changes the gas structure of your dough, producing a crumb that looks more like cake than bread.”
Three Tests for Starter Strength
Starter Readiness Checklist
If your starter smells aggressively of acetone or alcohol, it’s struggling. See our guide on sourdough starter smells like acetone — and how to fix it before your next bake.
How to Strengthen a Weak Starter
Feed at a 1:2:2 ratio (starter:flour:water) for several consecutive days. Use bread flour instead of all-purpose for a protein boost. Keep in a warmer environment — 75°F is ideal. Discard more aggressively to refresh the yeast balance and reduce the acid load. For a complete feeding protocol, see our guide on how to feed and maintain a sourdough starter.
Step 03 — Gluten Development Checklist
Even with perfect fermentation, weak gluten creates density. Gluten forms the scaffolding that traps gas bubbles. If it’s underdeveloped, those bubbles escape before and during the bake — and your crumb collapses inward.
Signs of Weak Gluten
Your dough tears easily during folding, fails the windowpane test, feels overly sticky throughout bulk, and spreads flat immediately after shaping rather than holding its form.
Gluten Development Checklist
If you skipped folds, your dough lacks internal scaffolding. Our stretch and fold schedule for beginners gives you the exact timing and technique to build strength reliably.
Step 04 — Baking Temperature Issues
You can ferment and develop gluten perfectly and still get a dense loaf if your baking conditions are wrong. This is the most underappreciated variable among beginners.
| Baking Mistake | What Happens | Fix |
|---|---|---|
| Dutch oven not preheated | Weak steam production, crust sets too early, rise is restricted | 475°F for 45 min minimum |
| Oven too cool | Reduced oven spring, pale crust, dense crumb | 475°F covered / 450°F uncovered |
| Underbaked | Internal temp below 205°F → gummy, dense center | Target 208–210°F internal |
| Lid removed too early | Crust sets before full spring, compressed crumb | Keep covered 20 min minimum |
Baking in a Dutch oven is the single most reliable way to control steam and get consistent oven spring. If you haven’t nailed that method yet, our complete guide on how to bake sourdough in a Dutch oven walks through every detail of the process.
Step 05 — Quick Diagnostic Table
Use this table to identify your issue fast. Find the symptom that matches your loaf, trace it to the cause, and apply the fix.
| Problem | Likely Cause | Immediate Fix |
|---|---|---|
| Tight crumb + gummy interior | Underproofed | Extend bulk 30–60 mins |
| Flat loaf, spreads sideways | Overproofed | Shorten proof, lower temp |
| Heavy crumb + weak oven rise | Weak starter | Feed consistently 3 days |
| Dough spreads during shaping | Weak gluten | Add more stretch & fold sets |
| Pale, soft crust | Low oven temp / Dutch oven cold | Preheat longer at 475°F |
| Gummy even when fully risen | Underbaked | Bake to 208–210°F internal |
| Large hole near top crust only | Underproofed + shaping issue | Longer bulk + tighter pre-shape |
The Sourdough Archive Masterclass
Get every technique, every visual cue, and every fix — in one complete course built for bakers who are serious about results.
Join the Course →Step 06 — The Real Secret: Fermentation Awareness
Dense sourdough is rarely about flour brand, hydration level, or recipe complexity. The bakers who consistently produce open, airy crumb have learned one core skill: reading their dough.
That means learning to track dough expansion, elasticity changes over time, temperature impact on fermentation speed, and timing relative to your specific environment — not the recipe’s environment.
“Once you understand fermentation behavior, density problems become predictable — and therefore fixable every single time.”
The bakers who still struggle after months are almost always skipping one of two things: they’re not measuring dough temperature, or they’re not using a clear container to track rise. Both are $10 fixes that eliminate the guesswork entirely.
Want to understand what your crumb is telling you after the bake? Our sourdough crumb guide teaches you how to read every hole, tunnel, and texture as diagnostic feedback for your next bake.
Need a complete process to follow from start to finish?
→ Read the full How to Make Sourdough Bread Step by Step — our complete beginner guide with visual fermentation cues, timing, and shaping instructions.
→ See all sourdough baking problem fixes — every baking failure diagnosed and fixed in one place.
→ See all sourdough starter problem fixes — if your dense loaf starts with a weak starter, fix it here first.
Master Every Loaf with the
Sourdough Archive Course
Dense crumb, flat loaves, weak oven spring — the course covers every failure point with clarity and step-by-step fixes.
Explore the Course →