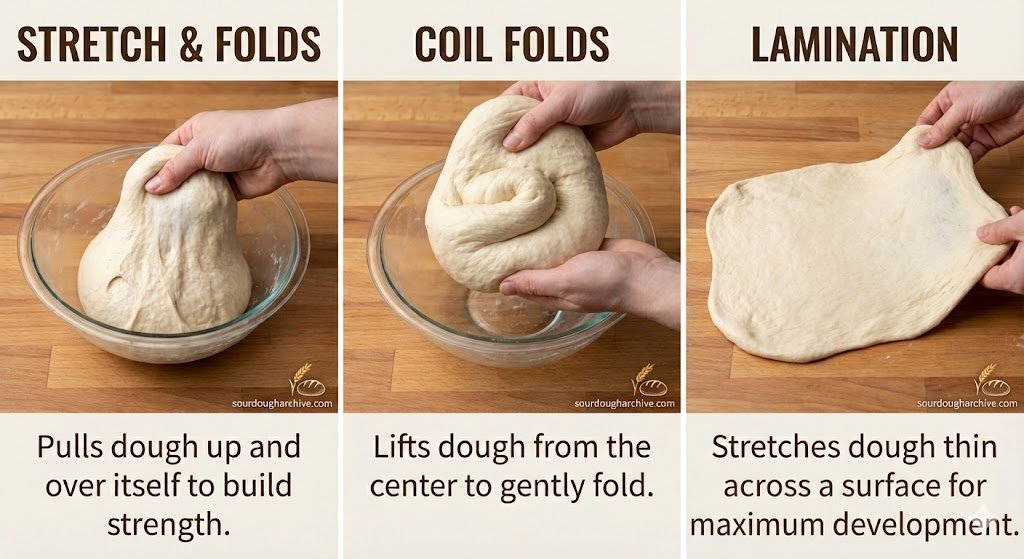
Stretch & folds are the most beginner-friendly option and build gluten strength quickly early in bulk; coil folds are gentler, preserve gas structure, and work beautifully mid-to-late bulk; lamination is an advanced single-use technique that maximises gluten development and is ideal for adding inclusions like seeds or cheese. You do not need all three — most bakers pick one or two that match their dough and workflow.
Quick Diagnostic Checklist
✅ Your folding technique is working correctly if:
- Dough becomes noticeably stronger and more cohesive with each set
- It holds its shape briefly when released instead of immediately spreading flat
- The surface is smooth and taut after folding, not torn or ragged
- By the final fold set, dough has a slight jiggle and visible gas structure when shaken
⚠️ Signs something went wrong:
- Dough tears during folds — gluten underdeveloped or dough too cold
- Dough feels the same after 4+ sets — starter may be sluggish; fermentation not progressing
- Dough collapses flat between fold sets — possible overproofing; check your aliquot jar
- Dough sticks aggressively to hands/container — high hydration or insufficient rest between sets
🎯 Ideal target state after all fold sets:
- Dough passes the windowpane test — stretches thin without tearing
- Surface feels smooth, slightly tacky, and alive with a soft springiness
- Holds a loose ball shape for 30+ seconds when released
- Aliquot jar shows steady, consistent rise beginning
1. Why Beginners Get Confused by Folding Techniques
When you first get into sourdough, recipes throw terms at you fast: “do 4 sets of stretch and folds,” “finish with a lamination,” “switch to coil folds after hour two.” It sounds like a different language — and the frustrating part is that different bakers swear by completely different approaches and still produce beautiful loaves.
The truth is, all three techniques are doing the same fundamental job: building gluten strength and dough structure during bulk fermentation without degassing the dough. They just do it in different ways, with different intensities, and are better suited to different moments in the process.
Once you understand what each technique is actually doing to the dough, choosing between them becomes intuitive. That’s what this guide is for.
If you want to understand what’s happening inside the dough during bulk fermentation while you’re folding, our Bulk Fermentation Readiness Guide gives you the full picture. And if you’re tracking rise with an aliquot jar, see our Aliquot Jar Guide — folding and tracking work hand-in-hand.
2. The Science: What Folding Actually Does to Your Dough
After mixing sourdough, the gluten network exists but is disorganised — strands of glutenin and gliadin proteins are tangled randomly throughout the dough. Folding physically realigns these strands, stacking them in layers and increasing the gluten network density and tension. Think of it like folding a piece of fabric repeatedly — each fold creates more layers and adds structure.
This matters for several reasons. A strong gluten network retains the CO₂ produced by yeast during fermentation, giving you better oven spring and a more open crumb. It also increases dough strength — the ability of the dough to hold its shape through preshaping, shaping, and proofing without spreading flat.
At the same time, folding must be done carefully. Aggressive folding late in bulk can degas the dough — popping the gas bubbles that have built up — which collapses the structure you’ve worked to create. This is why technique choice matters: you want to build strength early and preserve gas structure later.
Key scientific concepts involved in sourdough folding:
- Gluten network alignment — folding creates ordered, layered gluten strands that trap gas more efficiently
- Dough extensibility vs elasticity — extensibility is how far it stretches; elasticity is how quickly it snaps back. Good folds balance both.
- CO₂ retention — gentle folds preserve gas bubbles; aggressive folds burst them
- Enzymatic activity — as bulk progresses, protease enzymes slowly break down gluten; more folds early compensates for this
- Dough temperature — cold dough is stiffer and resists folding; warm dough is extensible but can degas more easily
- Inoculation % and timing — a higher-inoculation dough ferments faster, meaning you have less time for fold sets before bulk is complete
3. Stretch & Folds — The Beginner’s Best Friend
What They Are
Stretch and folds are performed in the bowl or container. You wet your hand, grab one side of the dough, stretch it upward as far as it will go without tearing, then fold it over to the opposite side. Rotate the bowl 90° and repeat — typically 4 times per set (north, east, south, west). This is one “set” of stretch and folds. You’ll usually do 3–5 sets spaced 30–45 minutes apart during the first half of bulk fermentation.
What They Do Well
- Build gluten strength quickly and efficiently from an unorganised post-mix state
- Easy to perform with wet hands — no bench required
- Beginner-friendly: low risk of degassing if done correctly
- Excellent for moderate hydration doughs (68–78%)
- Can be intensified (performing more folds per set) if dough is very slack
When to Use Them
Use stretch and folds primarily in the first 1–2 hours of bulk fermentation, when the dough is young, not yet gassy, and needs the most structural work. They are the default technique for most beginner recipes and work beautifully on their own for standard white and country loaves.
How to Do a Perfect Stretch & Fold Set
- Wet your dominant hand thoroughly — this prevents sticking
- Reach under one side of the dough and grab the bottom
- Stretch the dough straight upward — aim for 12–18 inches / 30–45cm if possible
- Fold it firmly over the top to the opposite side of the container
- Rotate the container 90° and repeat — 4 folds = 1 set
- After the set, gently round the dough into a loose ball shape in the container, cover, and rest for 30–45 minutes before the next set
Signs the dough is resisting: If it tears when you stretch it, it’s either too cold or the gluten is too tight from the previous set. Wait an extra 15 minutes before continuing.
4. Coil Folds — The Mid-Bulk Upgrade
What They Are
Coil folds are performed by lifting the dough from the centre with both hands (letting the ends hang down), then lowering it onto the container so the ends tuck underneath — like coiling a rope. Rotate the container 90° and repeat. That’s one coil fold. One set is typically 4 coil folds with 90° rotations. You’ll do 2–4 sets spaced 30–45 minutes apart.
What They Do Well
- Extremely gentle — they build tension without compressing or degassing the dough
- Work beautifully once the dough is already gassy and fragile mid-to-late bulk
- Create a beautiful surface tension that helps dough hold its shape
- Excellent for high hydration doughs (78%+) that are too delicate for aggressive stretching
- The preferred technique of many professional bakers for mid-bulk and beyond
When to Use Them
Use coil folds in the middle to later stages of bulk fermentation, after initial gluten development has been achieved through stretch and folds or mixing. They are the ideal “maintenance” fold — keeping structure and tension without disrupting the growing gas network. Many bakers start with 2–3 sets of stretch and folds, then switch to 2 sets of coil folds as bulk progresses.
How to Do a Perfect Coil Fold
- Wet both hands thoroughly
- Slide both hands underneath the dough at its centre, palms up
- Lift straight up — the dough will hang down on both sides like a curtain
- Lower it gently back into the container, letting one end tuck underneath
- Rotate the container 90°
- Repeat — lifting from the centre, lowering, tucking. Do 4 times per set.
- After the set, leave the dough in whatever shape it landed in — do not reshape it
Signs it’s working: After each coil fold set, the dough should look slightly taller and more compact — gathering into a tighter, rounded mass rather than spreading flat. By the final set, it should jiggle cohesively like a soft set jelly when you shake the container.

5. Lamination — The Advanced Power Move
What It Is
Lamination is a single, intensive gluten-building technique borrowed from professional bakeries. The dough is turned out onto a wet work surface, stretched into a large, thin sheet (ideally thin enough to see through), then folded back over itself in thirds — like a letter fold — creating dozens of gluten layers in a single session. It is done once, typically 30–60 minutes into bulk, before the dough becomes too gassy to handle.
What It Does Well
- The single most powerful gluten-building technique available to home bakers
- Creates an exceptionally strong, layered gluten network in one session
- Perfect for incorporating inclusions — seeds, nuts, dried fruit, cheese, herbs — which are scattered on the stretched sheet before folding
- Can partially replace multiple sets of stretch and folds
- Gives very high hydration doughs the structure they need
When to Use It
Lamination is best used as a single session early in bulk fermentation — usually 30–60 minutes after mixing, before the dough is too bubbly to handle without degassing. It’s not a replacement for all folds — you’ll still want 1–2 sets of coil folds afterward to maintain structure as bulk continues. Use it when you want maximum structure, are adding inclusions, or are working with a very slack high-hydration dough that needs serious early reinforcement.
How to Laminate Your Dough
- Wet your entire work surface generously with water — no flour
- Turn the dough out onto the wet surface
- Using wet hands, gently begin stretching the dough outward from the centre in all directions
- Work slowly and patiently — stretch toward one corner, then rotate and stretch another. Do not rush or tear.
- Aim for a large, even sheet — roughly 18″×24″ / 45×60cm for a standard 1kg dough. You should be able to hold it up to light and see through it in the thinner areas.
- If adding inclusions: scatter them evenly across the sheet now.
- Fold the dough into thirds from left to right (letter fold), then fold the resulting rectangle in thirds top to bottom — you now have a compact, layered parcel.
- Transfer back to your bulk container, seam-side down. Cover and rest 30–45 minutes before continuing with coil folds.
6. Side-by-Side Comparison
| Feature | Stretch & Folds | Coil Folds | Lamination |
|---|---|---|---|
| Difficulty | ⭐ Beginner | ⭐⭐ Intermediate | ⭐⭐⭐ Advanced |
| Best timing in bulk | Early (first 1–2 hrs) | Mid to late bulk | Very early (30–60 min in) |
| Gluten building strength | Strong | Moderate / maintenance | Maximum |
| Risk of degassing | Low–medium | Very low | Medium (if dough too gassy) |
| Best hydration range | 65–78% | 70–85%+ | 72–85% |
| Good for inclusions? | No | No | Yes — ideal |
| Equipment needed | Wet hands, bowl | Wet hands, bowl | Wet work surface + hands |
| Sets per bulk | 3–5 sets | 2–4 sets | 1 session only |
| Do you need a bench? | No | No | Yes |
7. How to Combine Techniques in One Bake
The most effective approach many experienced bakers use is a hybrid sequence — using different techniques at different stages of bulk to get the best of each. Here are three common workflows:
Workflow A — Beginner Standard (Stretch & Folds Only)
4 sets of stretch & folds at 30-minute intervals → rest → shape. Clean, simple, reliable. Perfect for your first 10–20 bakes.
Workflow B — Intermediate (Stretch & Folds → Coil Folds)
2 sets of stretch & folds (first hour) → 2 sets of coil folds (second hour) → rest → shape. The most common approach among home bakers with 6+ months of experience. Builds strength early, maintains it gently later.
Workflow C — Advanced (Lamination + Coil Folds)
30 min rest after mixing → 1 lamination session → 30 min rest → 2–3 sets of coil folds → rest → shape. Best for high-hydration doughs, loaves with inclusions, or when you want maximum open crumb. Not recommended until you’re comfortable reading dough at each stage.
8. Troubleshooting Folding Problems
Problem: Dough tears every time I try to stretch it
Why: The gluten is either underdeveloped (too soon after mixing — give it a 20-minute rest first) or the dough is too cold. Cold dough is stiff and inelastic. Fix: Let the dough rest longer between sets. Warm it briefly — 5 minutes in a slightly warm (not hot) oven, or let it sit in a warmer part of the kitchen. If it tears frequently throughout bulk, your flour may have lower protein content — try a bread flour with 12%+ protein for next time.
Problem: Dough feels exactly the same after each set — no improvement
Why: Usually a sign that fermentation is moving very slowly. Your starter may not be active enough, or the room temperature is too low. Fix: Check that your starter passed the float test before mixing and peaked within 4–6 hours of its last feed. Move bulk to a warmer spot — 75–78°F / 24–26°C is ideal. Check your aliquot jar to confirm fermentation is actually progressing.
Problem: Dough becomes very sticky and hard to handle during folds
Why: This is normal for high-hydration doughs, but can also indicate that fermentation is advancing faster than expected and the dough is softening due to increasing acidity breaking down gluten. Fix: Use wetter hands and work more quickly. If stickiness increases dramatically mid-bulk, check your aliquot — you may be closer to bulk completion than you think. Skip remaining fold sets and move toward preshaping.
Problem: My coil folds aren’t working — dough keeps spreading flat
Why: Either the dough is too slack (high hydration + low protein flour combination) or bulk fermentation has progressed too far and gluten is weakening. Fix: For slack dough, ensure your initial gluten development was thorough — do 3 sets of stretch and folds before switching to coil folds. If dough was firm earlier and is now suddenly spreading flat, this is an overproofing warning sign. Move to preshaping and refrigerate.
Problem: My lamination sheet tears before I can spread it fully
Why: The dough isn’t extensible enough yet — either it needs more rest after mixing, or the gluten is naturally tighter (lower hydration, high protein flour). Fix: Rest the dough for 45–60 minutes after mixing before attempting lamination. Keep the work surface very wet — any dry spots will cause the dough to stick and tear. Work slowly from the centre outward; never pull aggressively from the edges.
9. “I Folded Too Much / Too Little — Is My Dough Ruined?”
If you over-folded (too many sets, too aggressively, too late in bulk): The biggest risk is degassing. If you notice the dough feels flatter and denser after folding than before, stop immediately. Skip remaining fold sets and let the dough rest undisturbed. If bulk still has 2+ hours to go, the dough often recovers some gas structure on its own. Your crumb may be slightly less open than ideal, but the loaf will still be delicious.
If you under-folded (forgot a set, or only did 1–2 sets): Your dough may be a little weaker and may spread more during shaping. The fix is to make sure your preshaping and final shaping are done with extra care and intention, building surface tension deliberately. A well-shaped, weaker dough often outperforms a poorly-shaped, stronger one. Don’t panic — bake it.
If you laminated too late (dough was already quite gassy): You may have deflated some of the structure. Proceed with coil folds as planned, handle gently, and refrigerate the dough overnight for a cold proof before baking — this helps rebuild some structure and usually rescues the bake.
10. Frequently Asked Questions
How many sets of folds do I actually need?
Most doughs do well with 3–5 total fold sets during bulk, regardless of technique. You’re aiming for a dough that feels noticeably stronger and more structured at the end of each set than at the beginning. If your dough reaches that point after 3 sets, stop — more folding isn’t better, it’s just more.
Can I mix stretch & folds and coil folds in the same bake?
Yes — this is actually the recommended approach for most bakers. Start with stretch and folds when the dough is young and needs intensive work, then switch to coil folds as bulk progresses and the dough becomes more delicate and gassy.
Do I need to do folds at all? Can I just leave the dough alone?
Technically yes — some bakers use the “no-fold” method where they rely on a very long, slow bulk fermentation to develop gluten passively. This works best with lower hydration doughs and high-protein flour. However, for most beginner recipes, especially at higher hydrations, folding produces significantly better structure and a more predictable bake. It’s worth learning.
My recipe says “stretch and folds every 30 minutes for 2 hours” — is that always right?
It’s a solid starting template, but not a universal rule. Warmer kitchens, higher inoculation, or smaller doughs may mean bulk completes before 2 hours is up. Always let your aliquot jar and dough feel guide you over the clock. If the dough feels beautifully structured and the aliquot shows 50%+ rise, you’re done — regardless of what the timer says.
What is the windowpane test and when should I do it?
The windowpane test checks gluten development. Take a small piece of dough and stretch it between your fingers as thin as possible. If it stretches into a translucent sheet without tearing, your gluten is well developed. If it tears immediately, more folds are needed. Do the windowpane test after your final fold set to confirm the dough is ready for the bulk rest phase.
Does hydration affect which technique I should choose?
Yes, significantly. Lower hydration doughs (65–72%) are stiffer and respond well to stretch and folds — they have enough structure to handle the technique. Higher hydration doughs (78%+) are more delicate and benefit from the gentleness of coil folds once gassy. Lamination works across a wide range but requires the dough to be extensible — very low hydration doughs often won’t stretch thin enough for a good lamination.
Want printable fold timing charts, bulk fermentation trackers, and beginner-proof dough guides?
They’re all inside the Sourdough Mastery System:
👉 sourdougharchive.com/the-bundle
Related Sourdough Guides
- 📖 Complete Bulk Fermentation Readiness Guide — understanding what’s happening while you fold
- 📖 How to Use an Aliquot Jar — track rise % alongside your folding sets
- 📖 Dough Temperature & Fermentation (DDT Guide) — why temperature changes how folds behave
- 📖 How to Mix Sourdough Dough Properly — what happens before folding begins
- 📖 Underproofed vs Overproofed Sourdough — what folding mistakes look like in the final loaf
- 📖 Sourdough Mastery: The Complete Beginner’s Guide — start here if you’re new