Quick Answer: Bulk fermentation is done when your dough has risen 30–75% (depending on dough temperature), the surface looks domed and smooth, small bubbles are visible on the sides of the container, and the dough wobbles as one cohesive mass when you shake the bowl. No single sign is enough — look for all of them together.
Key Takeaways
- ✓ Never rely on time alone — dough temperature determines how long bulk takes
- ✓ The domed surface is the single most reliable visual sign
- ✓ The poke test is for final proofing — not for checking bulk fermentation
- ✓ Doubling is a myth — most doughs should be shaped well before doubling
- ✓ Signs of over-fermentation are just as important to know as signs of readiness
Knowing when bulk fermentation is done is one of the hardest skills in sourdough baking to develop — and the one that causes the most failed loaves. Unlike a timer or a recipe telling you exactly when to stop, bulk fermentation ends when your dough tells you it’s ready. This guide gives you the exact signs to look for so you can make that call confidently every time.
For the full timing breakdown by dough temperature, see our sourdough bulk fermentation chart. This guide focuses specifically on the visual and tactile signs that confirm it’s time to shape — regardless of what the clock says.
🧮 Calculate Your Bulk Fermentation Time
Before checking visual cues, calculate when your bulk fermentation should be complete:
Accounts for temperature, starter %, hydration, and flour type
Why You Can’t Trust the Clock
The most common reason bakers misjudge bulk fermentation is treating the recipe’s time estimate as a finish line. It isn’t. A recipe that says “bulk ferment for 4–6 hours” is giving you a range based on a specific kitchen temperature, starter percentage, and flour type. Change any of those variables and your time changes significantly.
Dough at 68°F may take 10 hours to reach the same fermentation level that dough at 78°F reaches in 4 hours. If you stop at 4 hours because the recipe said so, your cold-kitchen dough will be severely underfermented. The signs below are what actually tell you when bulk is done — use time only as a rough starting point for when to begin checking. For a full guide on how temperature controls timing, see our dedicated post on how long bulk fermentation takes.
The 7 Signs Bulk Fermentation Is Done
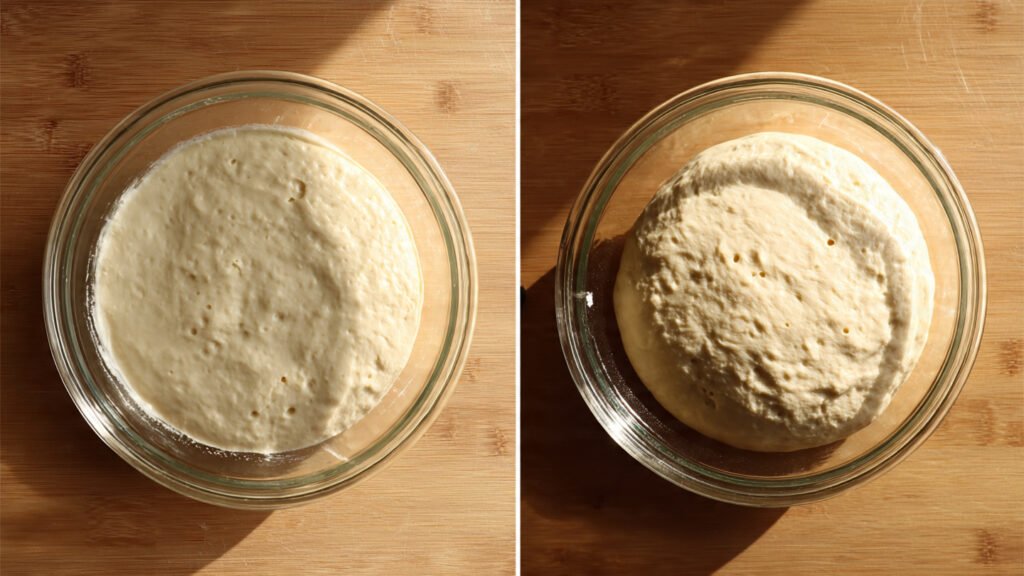
Check for these signs as a complete picture — not in isolation. One sign alone is not enough to call it done. Two or three together give you confidence. All of them together means shape immediately.
Sign 1: The Dough Has Risen 30–75%
This is the most objective measure and the one to anchor everything else to. Your dough should have increased in volume by 30–75% from its starting size — the exact target depends on your dough temperature:
| Dough Temperature | Target Rise Before Shaping |
|---|---|
| 65°F (18°C) | 75–100% |
| 70°F (21°C) | 50–75% |
| 75°F (24°C) | 30–50% |
| 80°F (27°C) | 25–30% |
| 85°F (29°C) | 20–25% |
To measure this accurately, use a straight-walled, clear container with volume markings. Note the starting volume immediately after mixing and track the rise. If you’re using a bowl without markings, use the aliquot jar method — take a small 20g sample in a straight-sided jar at the start and watch that rise instead. It’s far easier to track percentage rise in a small jar than in a large bowl.
The doubling myth: Many beginner recipes say “wait until it doubles.” This is one of the most damaging pieces of advice in sourdough baking. At 75°F, waiting for a full double almost always produces over-fermented, unshapeable dough. Shape well before doubling at any temperature above 70°F.
Sign 2: The Surface Looks Domed
Look at the top of your dough from the side. A properly fermented dough will have a domed, rounded top — slightly convex, like a gentle hill. This dome is caused by gas production pushing upward from within the dough mass.
If the surface looks flat, the dough probably needs more time. If the surface looks like it’s starting to collapse or pull away from the sides of the container, you’ve gone too far. The dome is your green light — a flat or sunken top is a red flag in either direction.
This is the single most reliable quick visual check. If the dome is there alongside one or two other signs, you’re very close to or at the right point.
Sign 3: Bubbles Are Visible on the Sides and Surface
Through the sides of a clear container, you should see small, uniform bubbles distributed throughout the dough — not just on the surface. These are carbon dioxide bubbles produced by wild yeast fermentation. Their presence throughout the dough mass (not just at the top) confirms that fermentation is active and relatively even.
What to watch for and what it means:
| What You See | What It Means |
|---|---|
| Small, uniform bubbles throughout | Fermentation is active and even — good sign |
| No bubbles visible anywhere | Under-fermented — needs more time |
| Large irregular bubbles only at surface | Over-fermented — shape immediately or rescue |
| Bubbles on sides but not surface yet | Close but not quite there — check other signs |
Sign 4: The Dough Jiggles as One Mass
This is the jiggle test — one of the fastest and most reliable checks you can do without touching the dough. Gently shake the bowl side to side. Observe how the dough moves.
- Properly fermented: The dough wobbles together as one cohesive, aerated mass — like set jelly. It moves as a unit, slightly lively but holding together.
- Under-fermented: The dough feels stiff and barely moves. It has little give — the gas network hasn’t developed enough to make it airy.
- Over-fermented: The dough sloshes like liquid. The surface ripples independently of the mass underneath. It feels wet and unstructured.
The jiggle test is particularly useful mid-bulk when you’re not sure how far along you are. A dough that barely moves needs significant time. A dough that wobbles gently is approaching readiness. A dough that sloshes needs to be shaped immediately — or rescued.
Sign 5: The Surface Is Smooth and Slightly Shiny
At the start of bulk fermentation, your dough looks shaggy and rough — the gluten hasn’t organized yet. By the end, the surface should look smooth, slightly shiny, and taut. This is a sign that the gluten network has developed properly through your stretch and fold sets and the ongoing fermentation activity.
A surface that still looks rough, dry, or uneven after a long bulk suggests either under-fermentation or insufficient folding during the early stages. A surface that looks very wet and sticky, pulling away from the container walls in threads, suggests over-fermentation — the protease enzyme has started breaking down the gluten network.
Sign 6: The Dough Feels Airy When Gently Pressed
Dip a finger lightly into the dough surface — just enough to feel the top layer. Properly fermented dough feels light and airy under your fingertip, almost pillowy. You can feel the gas trapped within the structure. Under-fermented dough feels dense and heavy, like putty. Over-fermented dough feels very soft and offers almost no resistance.
This is a supplementary check — do it gently and only once. Pressing repeatedly or too hard deflates gas bubbles and extends your bulk time unnecessarily.
Sign 7: The Dough Passes the Windowpane Test
Take a small piece of dough — about the size of a walnut — and slowly stretch it between your fingers. If it stretches thin enough to see light through without tearing, gluten development is sufficient. This is called the windowpane test.
Important clarification: The windowpane test confirms gluten strength — not fermentation level. A dough can pass the windowpane test at hour two and still need three more hours of fermentation. Use it as a final confirmation after the other signs are present, not as a standalone indicator that bulk is done. If your dough tears immediately during the windowpane test late in bulk, it may need more folds rather than more time — see our guide on what to do if your dough won’t pass the windowpane test.
Quick Reference: All 7 Signs at a Glance
| Sign | What to Look For | Reliable? |
|---|---|---|
| 1. Volume rise | 30–75% increase (temp-dependent) | Most objective — use as primary guide |
| 2. Domed surface | Rounded top, not flat or collapsed | Very reliable — best quick visual check |
| 3. Bubbles | Small uniform bubbles on sides and surface | Reliable when combined with dome |
| 4. Jiggle test | Wobbles as one cohesive mass | Very reliable — easy non-contact check |
| 5. Smooth surface | Taut, slightly shiny, not shaggy | Good secondary confirmation |
| 6. Airy feel | Light and pillowy under fingertip | Good supplementary check |
| 7. Windowpane test | Stretches thin without tearing | Confirms gluten strength — not fermentation level |
Signs Bulk Fermentation Has Gone Too Far
Knowing when to stop is as important as knowing the signs of readiness. Over-fermented bulk dough is harder to rescue than under-fermented dough — once gluten has been broken down by protease enzymes, no amount of reshaping will restore it. Watch for these warning signs:
- Surface has gone flat or collapsed inward — the dome peaked and fell; you’re past the window
- Large irregular bubbles on the surface — not the small uniform ones that indicate active fermentation
- Dough sloshes when the bowl is shaken — the gluten structure has broken down
- Strong smell of alcohol or acetone — the yeast has exhausted available sugars
- Dough spreads across the counter rather than holding shape — protease has degraded the protein network
- Dough tears rather than stretches — gluten threads have been broken down
If you see any of these signs, shape immediately — don’t give it more time hoping it will recover. If the dough is too far gone to shape into a traditional loaf, pivot to focaccia or flatbread. See our full rescue guide on how to fix overproofed sourdough for step-by-step recovery methods.
Signs Bulk Fermentation Is Not Done Yet
Under-fermented dough is more forgiving than over-fermented — you can always give it more time. Signs it needs to keep going:
- Surface looks flat and hasn’t risen noticeably from the start
- No bubbles visible on sides or surface
- Dough feels dense and stiff — doesn’t jiggle when shaken
- Surface still looks rough and shaggy rather than smooth
- Tears immediately during windowpane test with no elasticity
If your dough is consistently taking much longer than expected, the most common culprit is a cold kitchen or a weak starter. See our guide on what to do when your starter won’t double if you suspect your starter isn’t strong enough to drive fermentation efficiently. For cold kitchen solutions, our guide on keeping sourdough dough warm covers every practical option.
The Poke Test: Does It Work for Bulk Fermentation?
No — and this is a very common confusion. The poke test (pressing your finger into the dough and watching how it springs back) is designed for the final proof after shaping, not for bulk fermentation.
| Test | Use It For | Don’t Use It For |
|---|---|---|
| Poke test | Final proof — shaped dough in banneton | Bulk fermentation |
| Jiggle test | Bulk fermentation in container | Final proof |
| Windowpane test | Confirming gluten development during bulk | Confirming fermentation level |
| Volume + dome check | Primary bulk fermentation readiness indicator | Final proof |
During bulk fermentation, the dough is an unshaped mass — the poke test doesn’t apply because there’s no surface tension to spring back against. Use the poke test only after the dough has been shaped and is in its banneton or proofing bowl. For a full guide on reading the poke test correctly, see our bread poke test guide.
What Happens Right After Bulk Fermentation Ends
The moment you decide bulk fermentation is done, move quickly. Leaving the dough to sit while you prepare your bench or banneton gives fermentation time to continue — especially in a warm kitchen. Here’s what to do immediately:
- Turn the dough out onto a lightly floured surface — gentle, not aggressive
- Pre-shape into a rough round and let it rest 20–30 minutes (bench rest)
- Final shape — building surface tension with confident movements
- Transfer to banneton and refrigerate immediately for the cold proof
Don’t be tempted to reshape repeatedly if the dough feels a little soft. Degassing it too aggressively at this stage collapses the gas structure you’ve spent hours building. Shape once with confidence and get it into the fridge. See our guide on how to shape a sourdough boule or batard for technique.
Frequently Asked Questions
How do I know when bulk fermentation is done without a thermometer?
Look for three signs together: a domed surface, small uniform bubbles on the sides of the container, and dough that wobbles as one cohesive mass when you gently shake the bowl. These three together give you a reliable read without any tools. For more precision, use the aliquot jar alongside your main dough — when the small jar shows your target rise percentage, your main batch is ready.
Is bulk fermentation done when the dough doubles?
No — doubling is a myth that leads to overproofing at warmer temperatures. The correct rise target depends on your dough temperature. At 75°F, shape at 30–50% rise. At 65°F, rising close to double (75–100%) is appropriate. At 80°F, shape at just 25–30%. Use the temperature-based chart in our bulk fermentation chart rather than the “did it double” visual check.
Can I use the poke test to check bulk fermentation?
No — the poke test is for the final proof after shaping, not for bulk fermentation. During bulk, the dough has no surface tension to spring back against because it hasn’t been shaped yet. Use the jiggle test, dome check, and volume rise instead.
What does over-fermented bulk dough look like?
Over-fermented bulk dough has a flat or collapsed surface rather than a dome, large irregular bubbles rather than small uniform ones, and sloshes like liquid when the bowl is shaken. It smells strongly of alcohol or acetone and spreads flat rather than holding shape when turned out. If you see these signs, shape immediately and pivot to focaccia if the dough won’t hold a loaf shape. See our full rescue guide on how to fix overproofed sourdough.
How long should I wait before checking bulk fermentation signs?
Start checking at 60–70% of your estimated time based on dough temperature. At 78°F with 20% starter (estimated 4–5 hours), start checking around the 3-hour mark. During the second half of bulk, fermentation accelerates — what looks like 20% rise can become 50% in under an hour at warm temperatures. Set a 30-minute timer for check-ins once you’re past the halfway point.
What if my dough shows some signs but not all?
Give it more time. One or two signs is not enough to call bulk fermentation done. You want to see the dome, bubbles, jiggle, and volume rise all present together before shaping. If the dome is there but there are no bubbles, check again in 30 minutes. If the bubbles are there but the surface is still rough and the dough is stiff, it still needs time for gluten to organize and gas to build further.
Related Guides
- Sourdough bulk fermentation chart — temperature, time and rise % targets in one reference
- How long does bulk fermentation take — exact timing by dough temperature
- Bulk fermentation vs final proofing — what’s different between the two stages
- Aliquot jar method — the most accurate way to track rise percentage
- How to fix overproofed sourdough — rescue methods when bulk goes too far
- Underproofed vs overproofed sourdough — diagnosing what went wrong
- Stretch and fold schedule — what to do during bulk fermentation
- Bread poke test guide — how to use the poke test correctly for final proofing
- How dough temperature affects fermentation — the science behind timing
- Complete sourdough fermentation guide