
You opened the fridge, turned out your dough, and it spread flat across the counter. Or you left it on the bench too long and now it smells faintly of beer. Either way — you have overproofed sourdough, and you need to know what to do with it right now.
The short answer: don’t throw it away. Depending on how far gone the dough is, you can cold-reshape it into a loaf, turn it into focaccia, stretch it into flatbread, or recycle it entirely for your next batch. This guide covers all four fixes — and how to tell which one your dough needs.
What Is Overproofed Sourdough?
Overproofed sourdough is dough that has fermented for too long — past the point where the gluten network can support the gas produced by yeast activity. As fermentation continues beyond its ideal window, two things happen: the gluten structure weakens and eventually collapses, and the yeast exhausts most of the available sugars in the dough.
Visually, overproofed dough looks a lot like a balloon that’s slowly deflating. As gas builds up faster than the gluten can stretch to hold it, the walls between the trapped gas bubbles get thinner and thinner until they start to fail. Once that happens, you’ll see the surface go slack and wrinkled in the places where those bubbles used to be taut — a telltale sign the dough has lost its ability to hold structure, even before you touch it.
The result is dough that feels extremely soft and slack, spreads flat when turned out of the banneton, and produces little to no oven spring when baked. The final loaf — if baked without intervention — will be flat, dense, and pale with a gummy crumb.
Overproofing can happen at two different stages of the sourdough process: during bulk fermentation (the first rise, before shaping) or during the final proof (after shaping, in the banneton or fridge). Which stage went wrong determines which rescue method works best — and how recoverable your dough actually is.
The most reliable signs your sourdough is overproofed:
- The poke test leaves a permanent dent with no spring-back
- Dough spreads flat and wide immediately when turned out
- Surface looks shiny, blistered, wrinkled, or slightly wet — like a balloon starting to deflate
- Large surface bubbles with a visibly thin, fragile membrane, rather than small, taut bubbles
- Strong smell of beer, alcohol, or acetone
- Dough feels extremely sticky with zero tension
If these signs match your dough, the rescue methods below apply. If the dough springs back immediately when poked, you may be dealing with underproofing instead — which has completely different fixes.

Overproofed vs Underproofed Sourdough: How to Tell the Difference
Before you fix anything, you need to confirm you’re dealing with overproofing and not underproofing. Both produce a flat, dense loaf — but they have opposite causes and completely different fixes. Treating underproofed dough like overproofed dough (or vice versa) will make things worse.
| Sign | Overproofed | Underproofed |
|---|---|---|
| Poke test | Dent stays — no spring-back at all | Springs back immediately and completely |
| Dough texture | Extremely slack, sticky, zero tension | Tight, stiff, very elastic and springy |
| Smell | Strong beer, alcohol, or acetone | Mild, yeasty, fresh |
| Surface | Shiny, blistered, may have small tears | Smooth and tight-skinned |
| When turned out | Spreads flat and wide immediately | Holds shape firmly, very resistant |
| Oven spring | Little to none — loaf spreads sideways | Dramatic — loaf bursts at the sides or score |
| Crumb when baked | Dense and gummy, large holes near top | Dense bottom, large tunnels near the crust |
| The fix | Use a rescue method below | See our “>underproofed vs overproofed guide |
The most reliable way to confirm overproofing is the poke test. Press a floured finger about half an inch into the dough. If the dent stays and does not spring back, the dough is overproofed and the rescue methods below apply. If it springs back instantly, you’re dealing with underproofing instead.
What Happens When Bread Overproofs
When sourdough overproofs, two things happen simultaneously: the gluten network relaxes completely, and fermentation consumes most of the available sugars. The result is dough that is extremely soft and sticky, has lost all surface tension, cannot trap gas effectively, and will spread flat instead of rising in the oven.
One sign that’s easy to miss: if your dough smells strongly of beer, alcohol, or acetone, fermentation has gone too far. The yeast has exhausted its sugar supply — the loaf will be flat, pale, and overly sour even if you bake it straight.
Can you bake overproofed bread anyway? Yes — it won’t be dangerous or inedible — but the result will be flat, pale, and dense with a gummy crumb. Baking it as-is without a rescue method is the worst outcome. Spending 5 extra minutes on Fix #1 or Fix #2 below almost always produces something you’d actually want to eat.
Understanding which stage went wrong matters — because the rescue method differs. The further gone the dough is, the more creative your pivot needs to be.
What Is Over Fermented Sourdough?
Over fermented sourdough specifically refers to bulk fermentation — the first rise — going too long before the dough is shaped. It is the more serious of the two overproofing problems because by the time you go to shape the dough, the gluten has already been significantly degraded and the yeast has consumed most of the available sugars.
Unlike final proof overproofing, which is often recoverable with a cold reshape, over fermented bulk dough cannot be meaningfully rescued into a traditional loaf. The gluten simply cannot hold structure. Your best outcomes at this stage are focaccia, flatbread, or recycling the dough as Pâte Fermentée for your next bake — all covered in the fixes below.
The most telling sign of over fermented sourdough — as opposed to final proof overproofing — is the smell. A strong, sharp odour of beer, alcohol, or acetone means fermentation has gone well past its window. Combined with dough that tears rather than stretches during shaping attempts, this confirms bulk fermentation went too far.
For how to prevent this happening again, the bulk fermentation chart shows the correct rise targets by dough temperature — the single most reliable reference for catching bulk fermentation before it goes too far.
Over Fermented Sourdough vs Overproofed: Which Stage Went Wrong?
The terms over fermented sourdough and overproofed sourdough are often used interchangeably, but they technically refer to two different stages — and the rescue options differ.
For how to prevent this happening again, the bulk fermentation chart shows the correct rise targets by dough temperature — the single most reliable reference for catching bulk fermentation before it goes too far.
Over Fermented During Bulk Fermentation
Over fermentation during bulk (the first rise, before shaping) is the more serious problem. By the time you go to shape the dough, the gluten has been degraded and the yeast has exhausted most available sugars. The dough will feel extremely slack, won’t hold any tension when you try to shape it, and will spread like a puddle on the bench.
Signs of over fermented bulk dough:
- Dough has risen dramatically (more than doubled) and started to collapse or plateau
- Surface looks shiny, bubbly, or blistered — like the dough is sweating
- Strong smell of beer, alcohol, or acetone
- Dough tears rather than stretches during shaping attempts
- Sticks aggressively to the bench scraper and your hands
If bulk fermentation has gone too far, skip shaping into a traditional loaf entirely and go straight to the focaccia or flatbread rescue methods below. Attempting to shape and cold-proof over fermented bulk dough almost always produces a flat, dense result. See the bulk fermentation gone too long guide for how to prevent this next time, and the bulk fermentation chart to dial in your rise targets by temperature.
Overproofed During the Final Proof
Final proof overproofing — after shaping, in the banneton or fridge — is more common and usually more recoverable. The dough was shaped correctly but sat too long. The gluten is weakened but not destroyed.
Signs of overproofed final proof dough:
- Poke test leaves a permanent dent with no spring-back
- Dough spreads sideways rather than holding its shape when turned out
- Scoring feels gummy — the blade drags instead of cutting cleanly
- Very little oven spring — the loaf bakes flat
Final proof overproofing is best addressed with the cold-shape rescue (Fix #1) or the focaccia method (Fix #2) below.
4 Ways to Fix Overproofed Bread
| How Far Gone? | Best Fix |
|---|---|
| Slightly overproofed (final proof) | Fix #1: Cold-shape and bake |
| Moderately overproofed | Fix #2: Focaccia |
| Very overproofed (bulk) | Fix #3: Flatbread or pizza |
| Severely over fermented (liquid) | Fix #4: Pancake batter or Pâte Fermentée |
Fix #1: Cold-Shape Into a Loaf
This is your fastest rescue and works best when the dough is only slightly overproofed — it still has some structure left and holds its shape loosely when turned out.
- Refrigerate immediately. Dump the overproofed dough onto parchment paper and slide it into the coldest part of your fridge for 1–2 hours. Cold temperatures slow fermentation and firm up the gluten, making the dough easier to handle.
- Shape aggressively and stitch. After chilling, shape the dough tightly using a bench scraper, pulling it toward you with firm, confident motions. If it feels like it’s tearing, flip it seam-side up and quickly “stitch” the dough by pulling the edges into the center to build emergency tension. Surface tension won’t be perfect — that’s fine.
- Do not score deeply. This is not the time to attempt any of the 55 complex artisan patterns from our scoring library. Overproofed dough has lost the surface tension required to pull apart geometric designs. Stick to a single, shallow, functional slash to prevent total collapse, or skip scoring entirely — the loaf won’t have the oven spring needed to open a score anyway.
- Bake straight from the fridge. Don’t let it proof again — bake immediately at 450°F (230°C) for 40–45 minutes in a preheated Dutch oven.
What you’ll get: a denser loaf with a tighter crumb — not the open, airy structure you were after, but still delicious chewy sourdough. Infinitely better than throwing it away.
Fix #2: Make Overproofed Sourdough Focaccia (The Best Save)
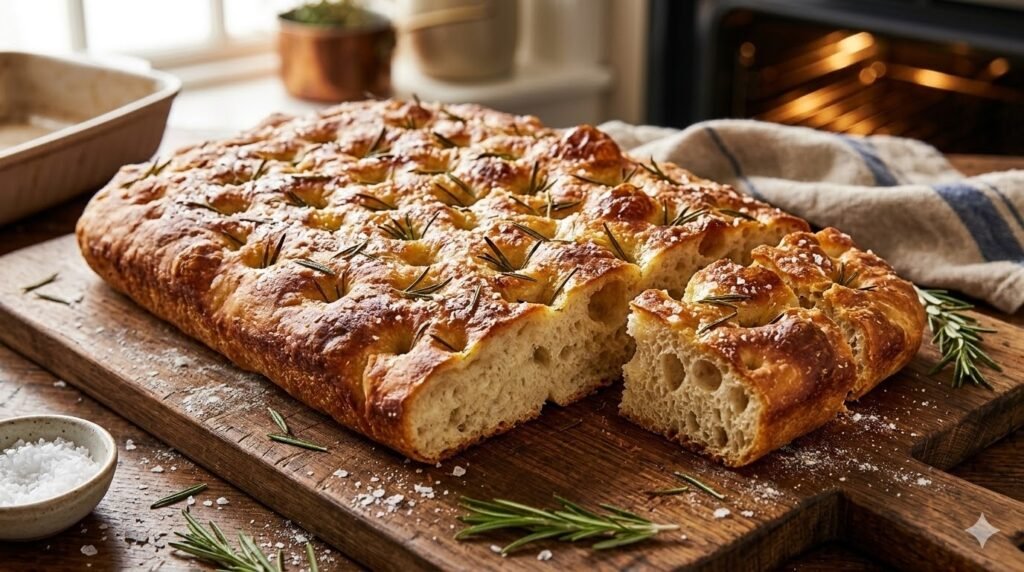
This is the most reliable rescue — and honestly, it often produces better focaccia than dough made intentionally for it. Overproofed dough is soft, oil-absorbing, and perfectly textured for focaccia. The lack of tension that makes it useless as a boule is exactly what you want here.
What You Need
- Your overproofed dough (any amount)
- A rimmed sheet pan (9×13″ works for a standard loaf batch)
- 4–6 tablespoons of olive oil
- Flaky sea salt
- Optional toppings: rosemary, garlic, olives, cherry tomatoes, caramelised onion
Method
- Oil the pan generously. Pour 3 tablespoons of olive oil into your sheet pan and spread it across the base and up the sides. This prevents sticking and creates the crispy base focaccia is known for.
- Transfer without shaping. Scrape your overproofed dough directly into the oiled pan. Do not pre-shape, knock it back, or attempt to add tension. Handle it as little as possible.
- Let it relax — 20 to 45 minutes. Cover the pan loosely with a damp cloth and leave at room temperature. Very slack dough needs the full 45 minutes to settle into the corners. Slightly overproofed dough may only need 20. You’ll know it’s ready when the dough has spread to the edges without you pressing it.
- Dimple deeply. Drizzle another 2–3 tablespoons of olive oil over the surface. Press all ten fingers firmly into the dough to create deep dimples across the entire surface — these hold the oil and toppings and give focaccia its signature look. Don’t be gentle.
- Add toppings. Scatter flaky salt generously. Add rosemary sprigs, halved cherry tomatoes, or thinly sliced garlic. Press toppings lightly into the dough so they hold during baking.
- Bake at 425°F (220°C) for 25–30 minutes. The focaccia is done when the top is deep golden and the edges have pulled slightly from the sides of the pan. The base should be crispy when you lift a corner with a spatula.
- Rest for 10 minutes before cutting. This lets the oil redistribute and makes slicing cleaner.
Tips for Very Slack Dough
If your dough is severely overproofed and too liquid to transfer cleanly, oil your hands before scooping it into the pan. Don’t try to make it look neat — focaccia is rustic by nature. Add an extra tablespoon of oil on top and extend the relax time to a full hour before dimpling. The result will still be better than anything you’d get from baking it as a loaf.
Most people genuinely cannot tell this came from overproofed dough. The flavour is often richer than standard focaccia because the extended fermentation has developed more complex acids.
Fix #3: Flatbread or Pizza Dough
When the dough is too far gone for a loaf but focaccia feels like too much effort, flatbread is your answer. It requires no shaping, no tension, and no oven spring — just a hot surface and 15 minutes.
- Handle as little as possible. Use your hands — not a rolling pin — to gently stretch the dough into a thin, rustic shape directly on oiled parchment.
- Bake on a hot surface. Use a preheated baking stone, cast iron skillet, or inverted baking sheet for better texture.
- Bake hot and fast. 475°F (245°C) for 12–15 minutes creates a crispy, cracker-like crust.
Flatbread from overproofed sourdough has a thin, crispy texture closer to naan or crackers than traditional bread — but it’s genuinely delicious. Top with hummus, cheese, or olive oil and herbs. For a more structured version, see our guide on sourdough flatbread without yeast.
Fix #4: Recycle as Pâte Fermentée or Pancake Batter
This is the advanced move for any dough that’s too liquid even for focaccia — turning your overproofed batch into a flavour-boosting ingredient for your next bake, or repurposing it as pancake batter.
As Pâte Fermentée (old dough):
- Refrigerate in an airtight container for up to 5 days.
- Use 100–150g per new batch when combining flour, water, and salt.
- Reduce bulk fermentation time by 30–60 minutes — the old dough jumpstarts the process.
Loaves made with Pâte Fermentée have richer, more complex flavour, faster fermentation, and better digestibility. See the bulk fermentation chart to manage the adjusted timeline.
As pancake batter: if the dough is severely over fermented and too liquid even for focaccia, add it directly to your favourite pancake recipe in place of some of the liquid, adjusting consistency as needed. The acidity and fermentation byproducts add a depth that discard alone can’t match. See our fluffy sourdough discard pancakes recipe for the base.
Can You Reverse Overproofed Bread?
You cannot fully reverse overproofed sourdough — the gluten structure has already weakened and the sugars are largely consumed. However, you can stabilise it by chilling and reshaping before baking, which is what Fix #1 does. The result won’t be your best loaf, but it will be an edible one.
If you’re not sure whether your dough is overproofed or just sticky from high hydration, see our guide on sourdough hydration — these two issues are frequently confused. For a visual guide to what each stage of proofing looks like, the sourdough proofing time chart is a useful reference.
How to Prevent Overproofed Sourdough Next Time
Use the poke test every time. Check your dough every 30 minutes during final proof — don’t rely on a timer alone. The poke test is the single most reliable way to catch overproofing before it’s too late.
Know your kitchen temperature. Dough at 78°F (26°C) finishes bulk fermentation in 3–4 hours. At 68°F (20°C), it may take 6–7 hours. Warm kitchens are the most common cause of accidental overproofing. See our guide on sourdough proofing temperature to understand how heat affects your dough, and bulk fermentation in a hot kitchen for warm-weather strategies.
Use the aliquot jar method. The aliquot jar lets you track exactly how much your dough has risen without disturbing the main batch — far more reliable than eyeballing the container.
Build your own muscle memory. Beyond timers and charts, the fastest way to get good at spotting proofing readiness is comparing today’s dough to how your best past loaves looked and felt at the same stage. When a bake turns out well, take a moment to notice the dough’s appearance, tackiness, and jiggle right before you baked it — and use that mental snapshot as your benchmark going forward. Recipe-specific muscle memory beats any chart once you’ve built it up.
Cold ferment overnight. If you’re unsure about timing, move the dough to the fridge. Cold fermentation dramatically widens your window and makes the dough overproof-resistant for hours longer. See our full guide on how long to cold proof sourdough for timing guidance.
Stop bulk fermentation earlier than you think. Most overproofing problems start because the baker waited too long during bulk. Check the bulk fermentation chart for the correct rise percentage at your dough temperature — waiting for a full double is one of the most common mistakes in sourdough baking.
Improve your shaping. Sometimes what looks like an overproofed result is actually weak surface tension from poor shaping. See our guides on how to shape a sourdough boule or batard and how to score sourdough to rule this out.
Frequently Asked Questions
Can overproofed bread be saved?
Yes — depending on how far fermentation has progressed. If the dough still has some strength, you can gently reshape and bake immediately. If it’s very loose, pivoting to focaccia or flatbread works better than attempting a traditional loaf.
Can you bake overproofed sourdough anyway?
Yes, but expect a flat, dense loaf with a pale crust and gummy crumb. The yeast has exhausted its sugars, so you’ll get little to no oven spring. It’s safe to eat — just not worth it when focaccia or flatbread takes the same time and tastes far better.
What does overproofed sourdough look like when baked?
Baked overproofed sourdough typically has a flat profile, weak oven spring, and a pale crust — since the yeast has used up most of the sugar that would otherwise brown the crust. The crumb usually shows large irregular holes near the top with dense, gummy areas near the bottom, caused by the dough partially collapsing in the oven. In more severe cases, the crumb can go the other direction entirely and turn tight and gummy throughout rather than holey, so don’t rule out overproofing just because the crumb looks dense rather than full of big holes. For a full crumb diagnosis, see our sourdough crumb guide.
How do I know if my sourdough is overproofed before baking?
Use the poke test: press your finger about half an inch into the dough. If the dent stays and doesn’t spring back, your dough is overproofed. Other signs include a slack and sticky texture, dough that spreads when turned out, a surface that looks shiny, blistered, or wrinkled (like a balloon starting to deflate), large surface bubbles with a visibly thin membrane, and a strong smell of beer or alcohol.
What is the difference between over fermented and overproofed sourdough?
Over fermented sourdough refers to bulk fermentation going too long — before the dough is shaped. Overproofed sourdough refers to the final proof going too long — after shaping. Both result in weak gluten and flat bread, but over fermentation during bulk is harder to recover from. If bulk fermentation has gone too far, focaccia or flatbread is your best rescue. The cold-shape method works better for final proof overproofing.
How many hours does it take to overproof sourdough?
It depends on temperature. At room temperature (70–75°F / 21–24°C), bulk fermentation typically runs 4–8 hours. In a warm kitchen at 80–85°F (27–29°C), dough can overproof in as little as 3–4 hours. Always monitor by dough behaviour, not the clock. See the sourdough proofing time chart for reference by temperature.
Can bread be proofed twice?
Yes — most sourdough goes through two fermentation stages: bulk fermentation and the final proof after shaping. This two-stage process improves both flavour and structure. For timing the second stage, see our guide on how long to cold proof sourdough.
Is it okay to eat overproofed sourdough?
Yes, overproofed sourdough is completely safe to eat. It will simply be denser, flatter, and less flavourful than a properly proofed loaf. The texture is often gummy or tight rather than open and airy — which is why using one of the rescue methods above gives you a far better result.
What is the longest you can let sourdough rise?
At room temperature (70–75°F), bulk fermentation typically runs 4–8 hours. Cooler kitchens may extend this to 10–12 hours. Cold proofing in the fridge can extend the window significantly — up to 36–48 hours in some cases — without overproofing, which is why many bakers prefer an overnight bulk fermentation or cold final proof.
Why does my sourdough smell like alcohol?
A strong alcohol or beer smell means the yeast has consumed most of the available sugars and fermentation has gone too far. This is a reliable signal of overproofing — particularly during bulk fermentation. See our dedicated guide on sourdough that smells like alcohol for more detail. At this stage, the focaccia or flatbread rescue methods will give you the best outcome.