Jump to Section
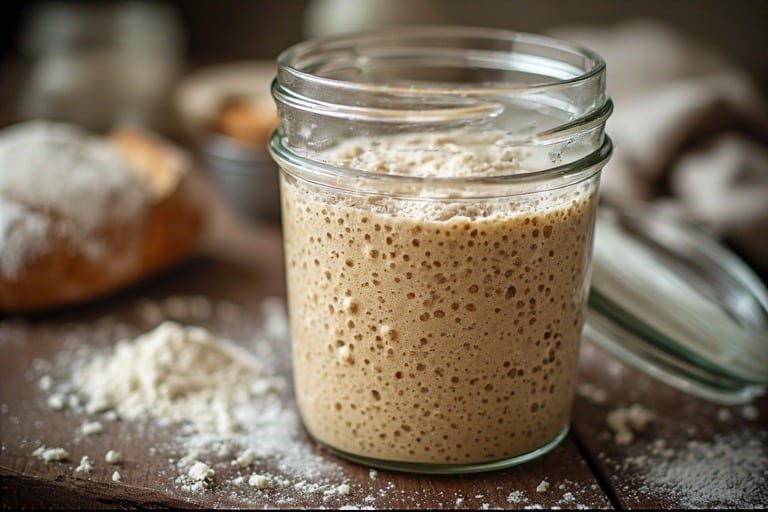
Most sourdough guides jump straight to recipe steps. This one doesn’t. If you already have an active starter and want to understand how it works inside your dough — not just when to add it, but what it’s doing at every stage — this is the guide for you.
Understanding your starter’s role is what turns inconsistent results into reliable, repeatable bread. Every stage of the process — mixing, fermentation, oven spring, flavor — is controlled by your starter. Get this right and the recipe almost doesn’t matter.
Don’t have a starter yet? See our sourdough starter recipe or our sourdough starter for dummies guide. Ready to bake? Our complete sourdough bread guide covers the full process alongside these concepts. Also check our post on how to use your sourdough starter for a practical bridge between a ready starter and a finished loaf.
How Your Starter Actually Makes Bread Rise
A sourdough starter is a living culture of wild yeast and lactic acid bacteria (LAB). When you mix a portion of it into dough, you’re seeding that dough with millions of active microorganisms. Here’s what they each do:
- Wild yeast consumes sugars in the flour and produces carbon dioxide gas. Those gas bubbles get trapped in the gluten network — that’s what makes the dough rise and gives you an open, airy crumb.
- Lactic acid bacteria (LAB) produce lactic and acetic acids during fermentation. These acids are responsible for sourdough’s tangy flavor, its longer shelf life compared to yeasted bread, and its improved digestibility.
Both organisms work in parallel from the moment your starter hits the dough. Temperature, hydration, and the amount of starter you use all control how fast they work — which is why those three variables are the real levers in sourdough baking.
Related: the fermentation triangle in sourdough — temperature, time, and inoculation explained.
Step 1: Confirming Starter Readiness
This is the most process-critical step and the one most beginners rush. Using starter that isn’t at peak activity is the single most common reason sourdough fails to rise properly.
Your starter is ready to use when all of the following are true:
- It has been fed within the last 4–12 hours (depending on ratio and temperature)
- It has doubled — or more than doubled — since feeding
- The top is domed, not yet collapsing or flat
- It is full of bubbles on the surface, throughout the body, and on the sides of the jar
- It smells pleasantly sour — tangy like yogurt, mildly yeasty like beer
The float test: drop an unstirred spoonful into a glass of water. If it floats, the starter has enough trapped gas and is ready to use. Pro tip: never stir the starter before testing — you’ll knock out the bubbles it needs to float, and a perfectly ready starter will sink and mislead you.
A starter that has peaked and collapsed will still ferment your dough — but more slowly, with less lift and a more acidic, less balanced flavor. It can work in a pinch, but for best results always catch it at or just before the dome starts to flatten.
See: how to know when sourdough is ready, sourdough poke test guide, and feeding sourdough starter schedule.
Step 2: How Much Starter to Use
The amount of starter you use is called your inoculation rate — and it’s one of the most powerful process controls in sourdough baking. It directly controls fermentation speed and flavor.
| Starter % | Typical Amount (per 450g flour) | Bulk Ferment Time (~75°F) | Flavor Profile |
|---|---|---|---|
| 5–10% | 25–45g | 10–14 hours | More complex, more sour |
| 15–20% | 68–90g | 5–8 hours | Balanced, moderately tangy |
| 25–30% | 113–135g | 3–5 hours | Milder, faster, less complex |
For most beginners: 15–20% is the sweet spot. Fast enough to give you clear fermentation activity within a manageable timeframe, slow enough to develop good flavor and give you room to work.
Process rule: more starter = faster fermentation = less sour. Less starter = slower fermentation = more sour, more complex flavor. Adjust based on your schedule and taste preference, not just what the recipe says.
Also relevant: sourdough hydration explained and sourdough hydration percentage explained — hydration and inoculation work together to control fermentation pace.
Step 3: How to Mix the Starter Into Dough
How you incorporate your starter affects how evenly it’s distributed through the dough — which affects how evenly the dough ferments.
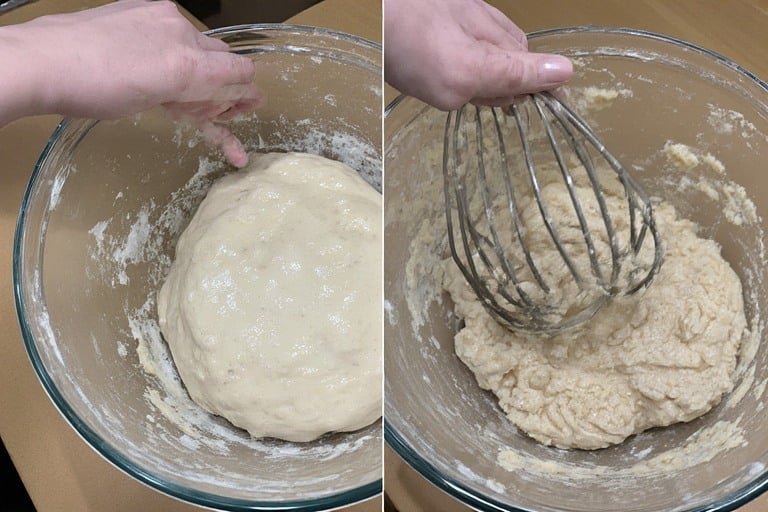
The Right Method
- Add your starter to the water first and stir until the water looks cloudy and milky. This disperses the starter evenly before the flour goes in.
- Add flour and mix until no dry streaks remain.
- Rest 30–45 minutes (autolyse) before adding salt. This lets the gluten begin to develop and gives the starter time to begin working before salt tightens the dough.
- Add salt after the rest, then fold it in thoroughly.
For a simple foolproof folding routine, follow my stretch and fold schedule for beginners — it takes the guesswork out completely.
Why starter before flour? Starter mixed into water first distributes the microorganisms more evenly throughout the dough mass. Clumps of undissolved starter create uneven fermentation pockets — some spots over-ferment, others under-ferment.
More on mixing: how to mix sourdough dough and sourdough autolyse guide.
Step 4: How the Starter Drives Bulk Fermentation
Once the starter is in the dough, it begins fermenting immediately. Bulk fermentation is the period where this fermentation does most of its work — building structure, developing flavor, and producing the gas that will eventually give you oven spring.
For the best results bake it in a Dutch oven — here’s my guide on how to bake sourdough in a Dutch oven with exact temperatures and timing.
Your starter’s health and timing directly controls how this stage behaves:
- Strong, peaked starter → active fermentation within 1–2 hours, predictable bulk timeline
- Overripe (collapsed) starter → sluggish start, longer bulk time, more acidic result
- Under-developed starter → very slow or no fermentation, dense loaf
Before you start the bulk rise, check the sourdough bulk fermentation chart for your dough temperature — this tells you exactly how long to expect and when to stop.
What to look for during bulk fermentation:
- Dough grows 50–75% in volume (not necessarily doubles)
- Bubbles visible on the surface and sides of the bowl
- Dough feels lighter and jiggles when you shake the bowl
- The surface looks slightly domed rather than flat
Temperature is the hidden variable. Your starter ferments faster at warmer temperatures. A dough that takes 8 hours to bulk at 68°F might only take 4 hours at 78°F. Track your dough’s behavior, not just the clock.
See: bulk fermentation for beginners, how to know when bulk fermentation is done, best bulk fermentation temperature, and how dough temperature affects fermentation.
Step 5: How Your Starter Affects Flavor
Sourdough’s flavor comes almost entirely from the acids your starter produces during fermentation. Understanding the two types of acid gives you control over the sourness of your bread:
- Lactic acid — produced in warmer, wetter conditions. Gives a mild, creamy, yogurt-like sourness. This is the dominant acid in a well-balanced loaf.
- Acetic acid — produced in cooler, drier, longer fermentations. Gives a sharp, vinegary sourness. Dominant in very sour San Francisco-style loaves.
How to control flavor through your starter process:
- Want a milder loaf? Use more starter (higher inoculation), ferment warmer, use at peak.
- Want more tang? Use less starter, ferment cooler, extend the cold proof, or use a slightly overripe starter.
- Want more complexity? Add a percentage of whole grain flour to your starter feedings — rye especially boosts acetic acid production.
Related: sourdough not sour — how to fix it and cold ferment sourdough for flavor development techniques.
When Starter Strength Is the Problem
Most sourdough problems trace back to the starter — not the recipe. Here’s how to diagnose starter-related issues:
Dough Won’t Rise During Bulk Fermentation
Your starter wasn’t active enough when you mixed. Give it 2–3 consecutive feedings at room temperature to build strength before your next bake. See: sourdough starter not working and why dough won’t rise.
Bread Is Dense with No Oven Spring
Either the starter was past peak (overripe) or too weak to generate enough gas. Always use starter at its domed peak — not an hour after it’s collapsed. See: why is my sourdough bread dense and how to get better oven spring.
Bread Is Way Too Sour
Fermentation went too long, or you used an overripe starter. Try a higher inoculation rate, a warmer bulk fermentation, and catching the dough earlier. See: bulk fermentation 101 — stop overproofing.
Bread Is Flat
Overproofed dough — the gas structure collapsed before baking. This happens when the dough ferments too long or the starter was already past peak when mixed. See: sourdough flat, overproofed vs underproofed sourdough, and how to fix overproofed sourdough.
Gummy Crumb
Usually under-fermented dough or a loaf cut before it fully cooled. Let it cool at least 1–2 hours after baking. See: sourdough gummy crumb and why is my sourdough gummy.

The Process at a Glance
| Stage | What Your Starter Is Doing | What to Watch |
|---|---|---|
| Pre-mix | Peaked and ready — wild yeast and LAB at maximum activity | Domed top, doubled, bubbly |
| Mixing | Dispersing evenly through the dough via water first | Cloudy water, no dry clumps |
| Autolyse | Beginning fermentation as gluten hydrates | Dough smooths out slightly |
| Bulk ferment | Producing CO2 (rise) and acids (flavor) continuously | 50–75% growth, bubbles, jiggle |
| Cold proof | Slowed fermentation — flavor deepening, structure setting | Slow, controlled activity |
| Baking | Final burst of oven spring as yeast exhaust remaining sugars | Ear opening, crust browning |
Frequently Asked Questions
Can I use starter straight from the fridge?
Technically yes, but your results will be inconsistent. Cold starter is sluggish — the yeast and bacteria are in near-hibernation. Always feed it and let it reach peak activity before mixing into dough. Even one good feeding makes a significant difference.
What if my starter peaked while I was asleep?
You can still use it if it hasn’t fully collapsed — a slightly overripe starter will produce a more acidic loaf but will still work. For best results, use a higher ratio (1:4:4 or 1:5:5) next time so the starter peaks in the morning when you’re ready to bake. See: sourdough starter feeding ratio chart.
Does the type of flour in my starter affect the bread?
Yes. A starter fed with whole grain flour (rye or whole wheat) is more active and produces more acetic acid — resulting in a more complex, tangy bread. A starter fed with all-purpose flour produces a milder, more consistent result. Neither is wrong — it depends on the flavor you’re after.
How do I know if my starter is strong enough to leaven bread?
It should reliably double within 4–8 hours of feeding at room temperature. If it’s not doing that consistently, give it 2–3 more feeding cycles before baking. See: sourdough starter not doubling.
Can I use discard instead of active starter?
Not for leavening a full sourdough loaf. Discard has little active yeast power and won’t reliably rise bread dough. It works well in quick recipes that don’t need a strong rise — see our sourdough discard crackers, fluffy discard pancakes, and sourdough discard tortillas.
My bread is good but not very sour — how do I fix that?
Reduce your inoculation rate, extend the cold proof, and try fermenting at a cooler temperature. These all shift production toward acetic acid (sharper sourness) rather than lactic acid (milder tang). More: sourdough not sour guide.
Shaping is one of those things that’s much easier to understand visually — my guide on how to shape a sourdough boule or batard will walk you right through it.
Final Thoughts
Your starter isn’t just one ingredient among several — it’s the engine that drives the entire process. Use it at peak, control how much you add, mix it in properly, and understand what it’s doing during fermentation, and every other variable in sourdough baking becomes easier to manage.
Want a complete beginner friendly version of this whole process in one place? My sourdough recipe for beginners has everything laid out start to finish.
Once you understand the process, head to our complete sourdough bread guide to put it all into practice. And if you want a full technique walkthrough, our baking bread with sourdough starter post covers every step from mixing to crust.