Jump to Section
- Step 1: Before You Mix — Starter Readiness
- Step 2: Mixing the Dough
- Step 3: Autolyse (The Rest That Changes Everything)
- Step 4: Bulk Fermentation
- Step 5: Stretch and Fold
- Step 6: Shaping
- Step 7: Proofing (Final Rise)
- Step 8: Scoring
- Step 9: Baking in a Dutch Oven
- Step 10: Cooling (Don’t Skip This)
- Troubleshooting
- FAQ

You have a bubbly, active starter. Now what? Baking bread with sourdough starter is a technique-driven process — and understanding why each step works is what separates a flat, dense loaf from a tall, open, golden one. This guide walks through every technique in order: from checking starter readiness all the way to the critical cooling period most beginners skip.
Don’t have a starter yet? Start with our sourdough starter recipe or our simplified sourdough starter for dummies guide first. Ready to bake? Our full how to make sourdough bread guide has the complete recipe alongside these techniques.
What You Need
Ingredients (One Loaf)
- 450g bread flour (high-protein, unbleached)
- 325g water at room temperature (~72% hydration — manageable for beginners)
- 100g active sourdough starter (fed, peaked, and bubbly)
- 9g fine sea salt
Equipment
- Kitchen scale (non-negotiable for consistent results)
- Large mixing bowl
- Dutch oven (cast iron, at least 4.5 qt)
- Banneton or bowl lined with a floured towel
- Bench scraper
- Lame or sharp razor blade for scoring
- Parchment paper
No Dutch oven? See our guide: how to bake sourdough without a Dutch oven.
Step 1: Before You Mix — Starter Readiness
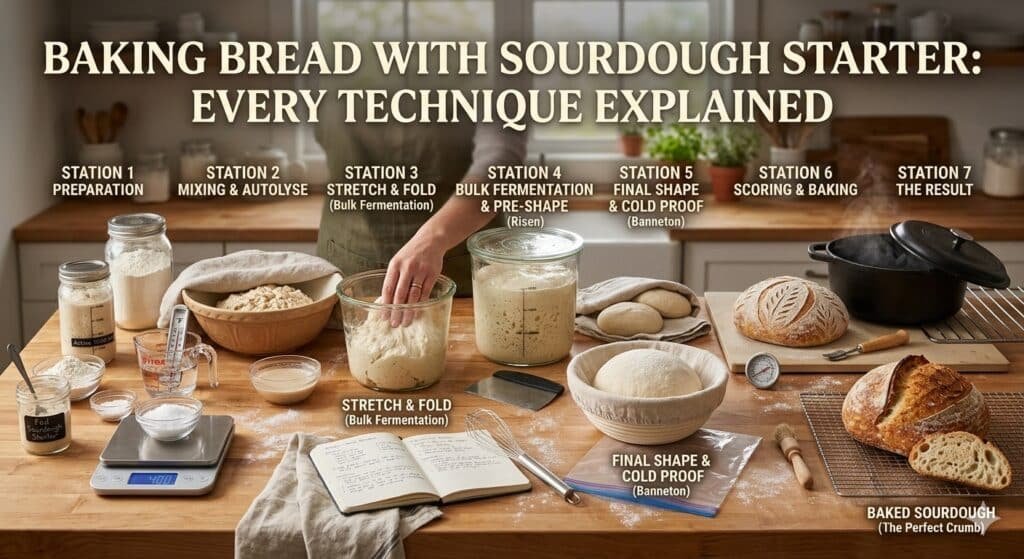
This is the most important technique decision you’ll make. Using your starter at the wrong time is the single biggest reason beginner loaves fail.
Your starter must be:
- Fed 4–12 hours before mixing (timing depends on your ratio and kitchen temperature)
- Doubled or more in size since feeding
- Domed at the top — not yet collapsing
- Full of bubbles on the surface and sides
- Smelling pleasantly sour, not sharp or alcoholic
Pro tip: Do not stir your starter before doing the float test — you’ll knock out the air bubbles it needs to float, and a perfectly ready starter will sink and fool you. Drop an unstirred spoonful into water; if it floats, you’re good to go.
Using starter that has already peaked and fallen produces bread with poor oven spring and weak flavor. See our full guide: how to know when sourdough is ready and feeding sourdough starter schedule.
Step 2: Mixing the Dough
Add your water to a large bowl. Add the starter and mix until dissolved — the water should look cloudy and slightly frothy. Then add the flour and mix until no dry flour remains. The dough will look shaggy and rough. That’s exactly right.
Do not add salt yet. Salt tightens gluten and can slow the initial hydration. Add it after the autolyse rest (Step 3).
Learn more about mixing technique in our how to mix sourdough dough guide.
Step 3: Autolyse — The Rest That Changes Everything
Cover the bowl and let the dough rest for 30–60 minutes. This is called autolyse. During this rest, flour fully absorbs the water and gluten begins to develop on its own — no kneading required. The result is a more extensible dough that’s easier to shape and produces a more open crumb.
After autolyse, sprinkle the salt over the dough, wet your hands, and pinch and fold it in until fully incorporated. The dough will feel more cohesive immediately.
Full breakdown: sourdough autolyse guide.
Step 4: Bulk Fermentation
Bulk fermentation is the first and most important rise. Cover the dough and leave it at room temperature until it has grown 50–75% in volume, feels airy when you shake the bowl, and has visible bubbles on the surface and sides.
The single most useful reference for this stage is the bulk fermentation temperature chart — it shows target rise percentages by dough temperature so you never have to guess.
How long does it take? Typically 4–12 hours depending on your kitchen temperature and starter strength. Warmer kitchens ferment faster. Watch the dough, not the clock.
The most common beginner mistake: under- or over-fermenting the dough. Underproofed dough won’t have enough structure; overproofed dough will be slack and won’t hold its shape during baking.
- Underproofed signs: dough hasn’t grown much, feels dense, tears when shaped
- Overproofed signs: dough is slack and sticky, collapses when touched, won’t hold shape
Related guides: bulk fermentation for beginners, how to stop overproofing, how to know when bulk fermentation is done, and best bulk fermentation temperature.
Step 5: Stretch and Fold
During the first 2 hours of bulk fermentation, perform 3–4 sets of stretch and folds, spaced 30 minutes apart. This replaces kneading — it builds gluten strength and dough structure without overworking the dough.
How to do a set: With wet hands, grab one side of the dough, stretch it up as far as it will go without tearing, then fold it over to the opposite side. Rotate the bowl 90° and repeat. Do this 4 times per set (all four sides). That’s one set.
After each set, the dough should feel tighter and more elastic. By the 3rd or 4th set it should hold its shape when you pull it up — that’s the gluten working.
See all techniques: stretch and fold schedule for beginners and sourdough folding techniques guide.
Step 6: Shaping
Once bulk fermentation is complete, turn the dough out onto an unfloured surface. Lightly flour your hands but not the bench — you want a little friction to help build tension.
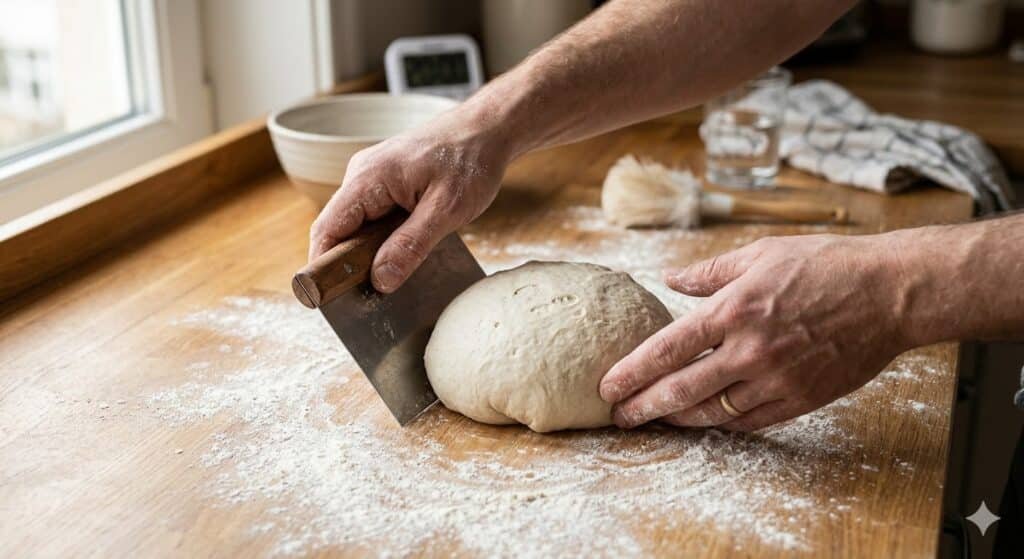
Pre-shape first: gently fold the dough into a rough round, flip it seam-side down, and use a bench scraper to drag it toward you in a circular motion to build surface tension. Let it rest uncovered for 20–30 minutes (bench rest).
Final shape: flip the dough, fold the sides in, then roll it toward you to create a tight boule (round) or batard (oval). The surface should feel taut — like a drum. Transfer seam-side up into a well-floured banneton.
If your dough feels too sticky to shape, read: how to fix sticky dough and sourdough dough too wet. Full shaping guide: how to shape a sourdough boule or batard.
Step 7: Proofing (Final Rise)
Cover the banneton with plastic wrap or a shower cap and refrigerate overnight — 8 to 16 hours. Cold proofing (retarding) slows fermentation, develops deeper flavor, and makes the dough much easier to score. The cold also sets the crust, giving you better oven spring.
You can also proof at room temperature for 2–4 hours if you need to bake the same day — but the cold proof produces a noticeably better loaf.
Poke test: gently press a floured finger into the dough. If the indentation springs back slowly and halfway, it’s proofed. If it springs back immediately, it needs more time. If it doesn’t spring back at all, bake immediately — it’s at the edge of overproofing. See: sourdough poke test guide.
More detail: sourdough cold proof fridge guide, how long to cold proof sourdough, sourdough proofing temperature, and sourdough proofing time chart.
Step 8: Scoring
Scoring is not decorative — it’s structural. A proper score controls where the bread expands in the oven. Without it, the loaf will burst randomly and lose its shape.
Turn the cold dough out onto parchment paper. Working quickly, make one confident slash at a 30–45° angle across the top using a lame or sharp razor blade. One decisive cut is better than multiple hesitant ones — dragging produces a ragged edge, not a clean ear.
Depth: about ¼ inch (0.5–1cm). Too shallow and it won’t open; too deep and the dough collapses.
Full technique: how to score sourdough.
Step 9: Baking in a Dutch Oven
Preheat your oven to 500°F (260°C) with the Dutch oven inside for at least 45–60 minutes. The Dutch oven traps steam from the dough during the first phase of baking — that steam is what gives sourdough its thin, crackly crust and allows maximum oven spring.
Two-Phase Baking
- Phase 1 — Lid on (20 minutes at 500°F): Steam trapped inside creates the open crumb and ear. Do not open the lid during this phase.
- Phase 2 — Lid off (20–25 minutes at 450°F): Remove the lid to expose the crust to dry heat. This is when browning and caramelization happen. Bake until deep golden brown — a pale crust means an underbaked loaf.
Pro tip: if your bottom crust is burning before the top is done, slide a baking sheet under the Dutch oven to diffuse the heat.
More: how to bake sourdough in a Dutch oven and how to get better oven spring.

Step 10: Cooling (Don’t Skip This)
Remove the loaf from the Dutch oven and place it on a wire rack. Do not cut into it for at least 1–2 hours. This is not optional.
The interior of sourdough continues to cook and set as it cools — the steam inside is still working. Cut too early and you get a gummy, undercooked crumb even if the outside looks perfect. A gummy interior is one of the most common complaints from beginners and almost always caused by cutting too soon. See: sourdough gummy crumb and why is my sourdough gummy.
Sample Baking Schedule
Here’s a realistic weekend schedule that fits around a normal life:
| Time | Action |
|---|---|
| Friday 8pm | Feed starter |
| Saturday 8am | Starter at peak — mix dough, autolyse 45 min, add salt |
| Saturday 8:45am–12pm | Bulk fermentation with 4 sets of stretch and folds |
| Saturday 12pm | Pre-shape, bench rest 25 min, final shape |
| Saturday 12:30pm | Into banneton, cover, refrigerate overnight |
| Sunday 8am | Preheat oven + Dutch oven to 500°F for 1 hour |
| Sunday 9am | Score and bake — 20 min lid on, 22 min lid off |
| Sunday 10am | Out of oven. Wait at least 1 hour before cutting. |
Troubleshooting Common Problems
Bread is dense with no oven spring
Usually starter-related — it wasn’t at peak when you mixed, or it’s not strong enough yet. Feed your starter 2–3 times before your next bake. Also check: why is my sourdough so dense .
Bread is flat
Overproofed dough loses its gas and structure. See: sourdough flat, how to fix overproofed sourdough, and how to save overproofed sourdough.
Gummy or undercooked crumb
Almost always cut too early. Let it cool for a full 2 hours next time. See: sourdough gummy crumb.
Dough too sticky to shape
Work with wet hands not floured ones, keep the dough cold, and don’t rush the shaping. See: how to fix sticky dough.
No ear on the crust
Your score was too shallow or too vertical. Angle the lame at 30–45° and go deeper with one confident cut. Also check that the dough was cold when scored — warm dough won’t hold the cut. See: how to score sourdough.
Frequently Asked Questions
How much starter do I use for one loaf?
Typically 15–20% of the flour weight. For 450g flour that’s 75–90g of starter. More starter = faster fermentation; less = slower with more complex flavor.
Can I skip the cold proof?
Yes — proof at room temperature for 2–4 hours instead. But the cold proof gives better flavor, easier scoring, and more dramatic oven spring. It’s worth it.
Do I need to preheat the Dutch oven?
Yes, always. A cold Dutch oven will not give you the burst of heat the dough needs for maximum oven spring. Preheat for at least 45 minutes, ideally an hour.
What hydration should beginners use?
Start at 70–75%. Higher hydration produces a more open crumb but is much harder to handle. Master shaping at 72% before you experiment with wetter doughs. See: sourdough hydration explained.
Why does my bread smell so sour?
A very sour loaf usually means over-fermented dough or a very acidic starter. Try a shorter bulk fermentation or a lower ratio of starter next time. See: sourdough not sour guide for the flavor levers you can pull.
Final Thoughts
Baking bread with sourdough starter is a sequence of techniques — and each one builds on the last. Get your starter timing right, don’t rush the fermentation, shape with confidence, and always let the loaf cool fully before you cut it. Follow those four principles and the results will surprise you.
For the full recipe alongside these techniques, visit our complete sourdough bread guide. New to sourdough entirely? Start with how to use your sourdough starter — it bridges the gap between a ready starter and your first bake.